This section describes how to deploy the YMatrix disaster recovery components and a backup cluster, using an existing YMatrix database cluster as the primary (master) cluster.
Before deploying the disaster recovery functionality, understand the following four key concepts:
YMatrix Database Cluster
A fully functional YMatrix database cluster, including high-availability components and database services.
Primary Cluster (Master Cluster)
The database cluster that normally provides data services or requires data protection via disaster recovery.
Backup Cluster
A database cluster that has received data from the primary cluster and can restore data or provide data services in the event of a disaster.
Disaster Recovery Components
Components enabling data backup from the primary cluster and service failover during disaster recovery. These include:
Subscriber
The Subscriber is a disaster recovery component deployed on the primary cluster side. Its functions are:
a. Receive backup requests from the Publisher on the backup cluster side and forward them to the primary cluster.
b. Capture backup data from the primary cluster and transmit it to the Publisher on the backup cluster side.
The Subscriber must be deployed on a dedicated machine within the same subnet as the primary cluster, with network connectivity to all nodes in the primary cluster.
Additionally, this machine must have network connectivity to the machine hosting the Publisher on the backup cluster side (preferably within the same subnet).
Publisher
The Publisher is a disaster recovery component deployed on the backup cluster side. Its functions are:
a. Receive backup requests from the backup cluster and forward them to the Subscriber on the primary cluster.
b. Receive backup data from the Subscriber and deliver it to the backup cluster.
The Publisher must be deployed on a dedicated machine within the same subnet as the backup cluster, with network connectivity to all nodes in the backup cluster.
This machine must also maintain network connectivity to the machine hosting the Subscriber on the primary cluster side.
Backup Cluster
While operating in backup mode, the backup cluster asynchronously or synchronously replicates all data from the primary cluster and supports read-only operations.
After a disaster recovery switchover, the backup cluster becomes a fully functional YMatrix database cluster, supporting all types of data operations.
Note: The backup cluster currently does not support high availability; each data shard has only one replica.
To enable disaster recovery, the GUC parameter synchronous_commit on the primary cluster supports only the following values: off (recommended), local, remote_apple, and on.
Before deployment, log in to the Master node of the primary cluster as user mxadmin and run the following command to set the synchronous_commit parameter:
gpconfig -c synchronous_commit -v <one_of_the_supported_values>Run the mxstop -u command to reload the configuration and apply the changes.
Primary Cluster Side
Backup Cluster Side
Interconnection Between Sides
Note: This network setup applies specifically when deploying the backup cluster in a different data center than the primary cluster. Adjust accordingly for other deployment scenarios.
Note!
The YMatrix software version installed on the backup cluster must exactly match the version on the primary cluster.The CPU architecture of the backup cluster must be identical to that of the primary cluster.
Add Subscriber Machine to Primary Cluster Side
a. Install the same version of YMatrix database software on the Subscriber machine as on the primary cluster.
b. On any node of the primary cluster, use root privileges to add the hostname (or IP address) of the Subscriber machine (Subscriber Primary-Side IP) to the /etc/hosts system file.
c. On the primary cluster’s Master machine, log in as user root and create a configuration directory:
mkdir ~/subscriberThen execute the following commands:
  # Initialize expand
  /opt/ymatrix/matrixdb6/bin/mxctl expand init \
  > ~/subscriber/expand.init

  # Add subscriber host
  cat ~/subscriber/expand.init | \
  /opt/ymatrix/matrixdb6/bin/mxctl expand add --host {{subscriber_hostname_or_primary_side_IP}} \
  > ~/subscriber/expand.add

  # Perform network connectivity check
  cat ~/subscriber/expand.add | \
  /opt/ymatrix/matrixdb6/bin/mxctl expand netcheck \
  > ~/subscriber/expand.nc

  # Generate plan
  cat ~/subscriber/expand.nc | \
  /opt/ymatrix/matrixdb6/bin/mxbox deployer expand --physical-cluster-only \
  > ~/subscriber/expand.plan

  # Execute plan
  cat ~/subscriber/expand.plan | \
  /opt/ymatrix/matrixdb6/bin/mxbox deployer exec
d. Edit the pg_hba.conf file on all segments (including master, standby, primaries, and mirrors) of the primary cluster. Insert the following line before the #user access rules section (preferably before the first non-trust rule) to allow replication connections from the Subscriber:
host all,replication mxadmin {{subscriber_primary_side_IP}}/32 truste. On the primary cluster's Master machine, log in as user mxadmin and run the following command to reload the configuration and activate the pg_hba.conf setting:
/opt/ymatrix/matrixdb6/bin/mxstop -uSubscriber Configuration File
a. On the Subscriber machine, log in as user mxadmin and create a config directory:
mkdir ~/subscriberb. Using user mxadmin, create the Subscriber configuration file ~/subscriber/sub.conf based on the template below:
 # ~/subscriber/sub.conf
 module      = 'subscriber'
 perf_port   = 5587
 verbose     = true # Set log level as needed
 debug       = false # Set log level as needed

 [[receiver]]
 type                                    = 'db'
 cluster_id                              = ''              # Primary cluster cluster_id
 host                                    = ''              # Hostname or IP of primary cluster master
 port                                    = 4617            # Listening port of primary cluster master supervisor
 dbname                                  = 'postgres'
 username                                = 'mxadmin'
 resume_mode                             = 'default'
 restore_point_creation_interval_minute  = '3'             # Data consistency ensured via restore points
                                                           # Controls interval between restore point creation
                                                           # Adjustable per requirement
                                                           # Default is 5 minutes
 slot = 'internal_disaster_recovery_rep_slot'              # Deprecated option (retained temporarily)

 [[sender]]
 type        = 'socket'
 port        = 9320    # Listening port of subscriber
Supervisor Configuration File
a. As user root, create a configuration file subscriber.conf under /etc/matrixdb6/service to manage subscriber via supervisor:
 # /etc/matrixdb/service/subscriber.conf
 [program:subscriber]
   process_name=subscriber
   command=%(ENV_MXHOME)s/bin/mxdr -s <COUNT> -c /home/mxadmin/subscriber/sub.conf
   directory=%(ENV_MXHOME)s/bin
   autostart=true
   autorestart=true
   stopsignal=TERM
   stdout_logfile=/home/mxadmin/gpAdminLogs/subscriber.log
   stdout_logfile_maxbytes=50MB
   stdout_logfile_backups=10
   redirect_stderr=true
   user=mxadmin
Here, <COUNT> represents the number of shards in the primary cluster, which can be obtained by running:
SELECT count(1) FROM gp_segment_configuration WHERE role='p'Run and Manage Subscriber with Supervisor
a. On the Subscriber machine, log in as user root and run the following commands to register and start the Subscriber under supervisor:
 /opt/ymatrix/matrixdb6/bin/supervisorctl update
/opt/ymatrix/matrixdb6/bin/supervisorctl start subscriberInstall the same version of YMatrix database software (as the primary cluster) on both the Publisher and backup cluster machines, along with required dependencies.
On a node in the backup cluster side, use root privileges to add the Publisher hostname (Publisher Backup-Side IP) to the /etc/hosts system file.
On the Publisher machine, log in as user root and create a configuration directory:
mkdir ~/publisherGenerate Mapping Configuration File
On the primary cluster's Master machine, log in as user mxadmin and run the following SQL to generate a template file /tmp/mapping.tmp for shard mapping:
 COPY (
     SELECT content, hostname, port, datadir
     FROM gp_segment_configuration
     WHERE role='p'
     ORDER BY content
 ) TO '/tmp/mapping.tmp' DELIMITER '|'
Modify the generated file according to actual deployment details:
content) indicates the primary cluster’s content id and should remain unchanged.主机名: Hostname of the backup segmentprimary 端口号: Port number of the backup segment数据目录: Data directory path of the backup segmentUse the following command for detailed help:
mxbox deployer dr pub configAfter modification, move the file to the ~/publisher directory of user root on the Publisher machine.
Example before and after modification:
| Before | After |
|---|---|
 |
 |
Publisher Configuration File
On the Publisher machine, as user root, create the Publisher configuration file ~/Publisher/pub.conf using the following template:
   # ~/publisher/pub.conf
     module      = 'publisher'
     perf_port   = 6698
     verbose     = true # Set log level as needed
     debug       = false # Set log level as needed

     [[receiver]]
     type        = 'socket'
     host        = ''        # Subscriber external IP (from above)
     port        = 9320      # Subscriber listening port

     [[sender]]
     type        = 'db'
     host        = '127.0.0.1'
     listen      = 6432         # Base listening port for publisher; varies with shard count
     username    = 'mxadmin'
     dbname      = 'postgres'
     dir         = '/tmp'       # Temporary directory for runtime data
     schedule    = 'disable'    # Disable M2 scheduler
Deploy the Backup Cluster
On the Publisher machine, log in as user root and follow these steps:
a. collect
Collect hardware and network information for the backup cluster nodes.
     # Collect info from master node
     /opt/ymatrix/matrixdb6/bin/mxctl setup collect --host {{backup_cluster_master_IP}} \
     > ~/publisher/collect.1

     # Collect info from other segment hosts
     cat ~/publisher/collect.1 | \
     /opt/ymatrix/matrixdb6/bin/mxctl setup collect --host {{other_backup_host_IP}} \
     > ~/publisher/collect.2

     ...

     # Collect info from last segment host
     cat ~/publisher/collect.n-1 | \
     /opt/ymatrix/matrixdb6/bin/mxctl setup collect --host {{other_backup_host_IP}} \
     > ~/publisher/collect.n

     # Collect info from publisher host
     cat ~/publisher/collect.n | \
     /opt/ymatrix/matrixdb6/bin/mxctl setup collect --host {{publisher_IP}} \
     > ~/publisher/collect.nc
b. netcheck
Check network connectivity among backup cluster nodes.
 cat ~/publisher/collect.nc | \
 /opt/ymatrix/matrixdb6/bin/mxctl setup netcheck \
 > ~/publisher/plan.nc
c. plan
Generate the deployment plan for the Publisher.
 /opt/ymatrix/matrixdb6/bin/mxbox deployer dr pub plan \
     --wait \
     --enable-redo-stop-pit \
     --collect-file ~/publisher/plan.nc \
     --mapping-file ~/publisher/mapping.conf \
     --publisher-file ~/publisher/pub.conf \
 > ~/publisher/plan
Note!
You must set--enable-redo-stop-pit. This option ensures final data consistency in the backup cluster.
d. setup
Deploy the backup cluster and connect it to the Publisher to begin data replication.
 /opt/ymatrix/matrixdb6/bin/mxbox deployer dr pub setup \
--plan-file ~/publisher/planPrimary Cluster walsender
root and run: ps aux | grep postgres | grep walsendersubscriber should exist and be in state streaming, as shown below:
Subscriber
mxadmin and run: supervisorctl statussubscriber should exist and be in state Running:
Publisher
mxadmin and run: supervisorctl statuspublisher should exist and be in state Running:
Backup Cluster walreceiver
root and run: ps aux | grep postgres | grep walreceiversubscriber should exist and be in state streaming:
Note: The total number of
walreceiverprocesses across the backup cluster should equal the number of shards in the original cluster.
Follow these steps to verify replication:
Cluster Topology
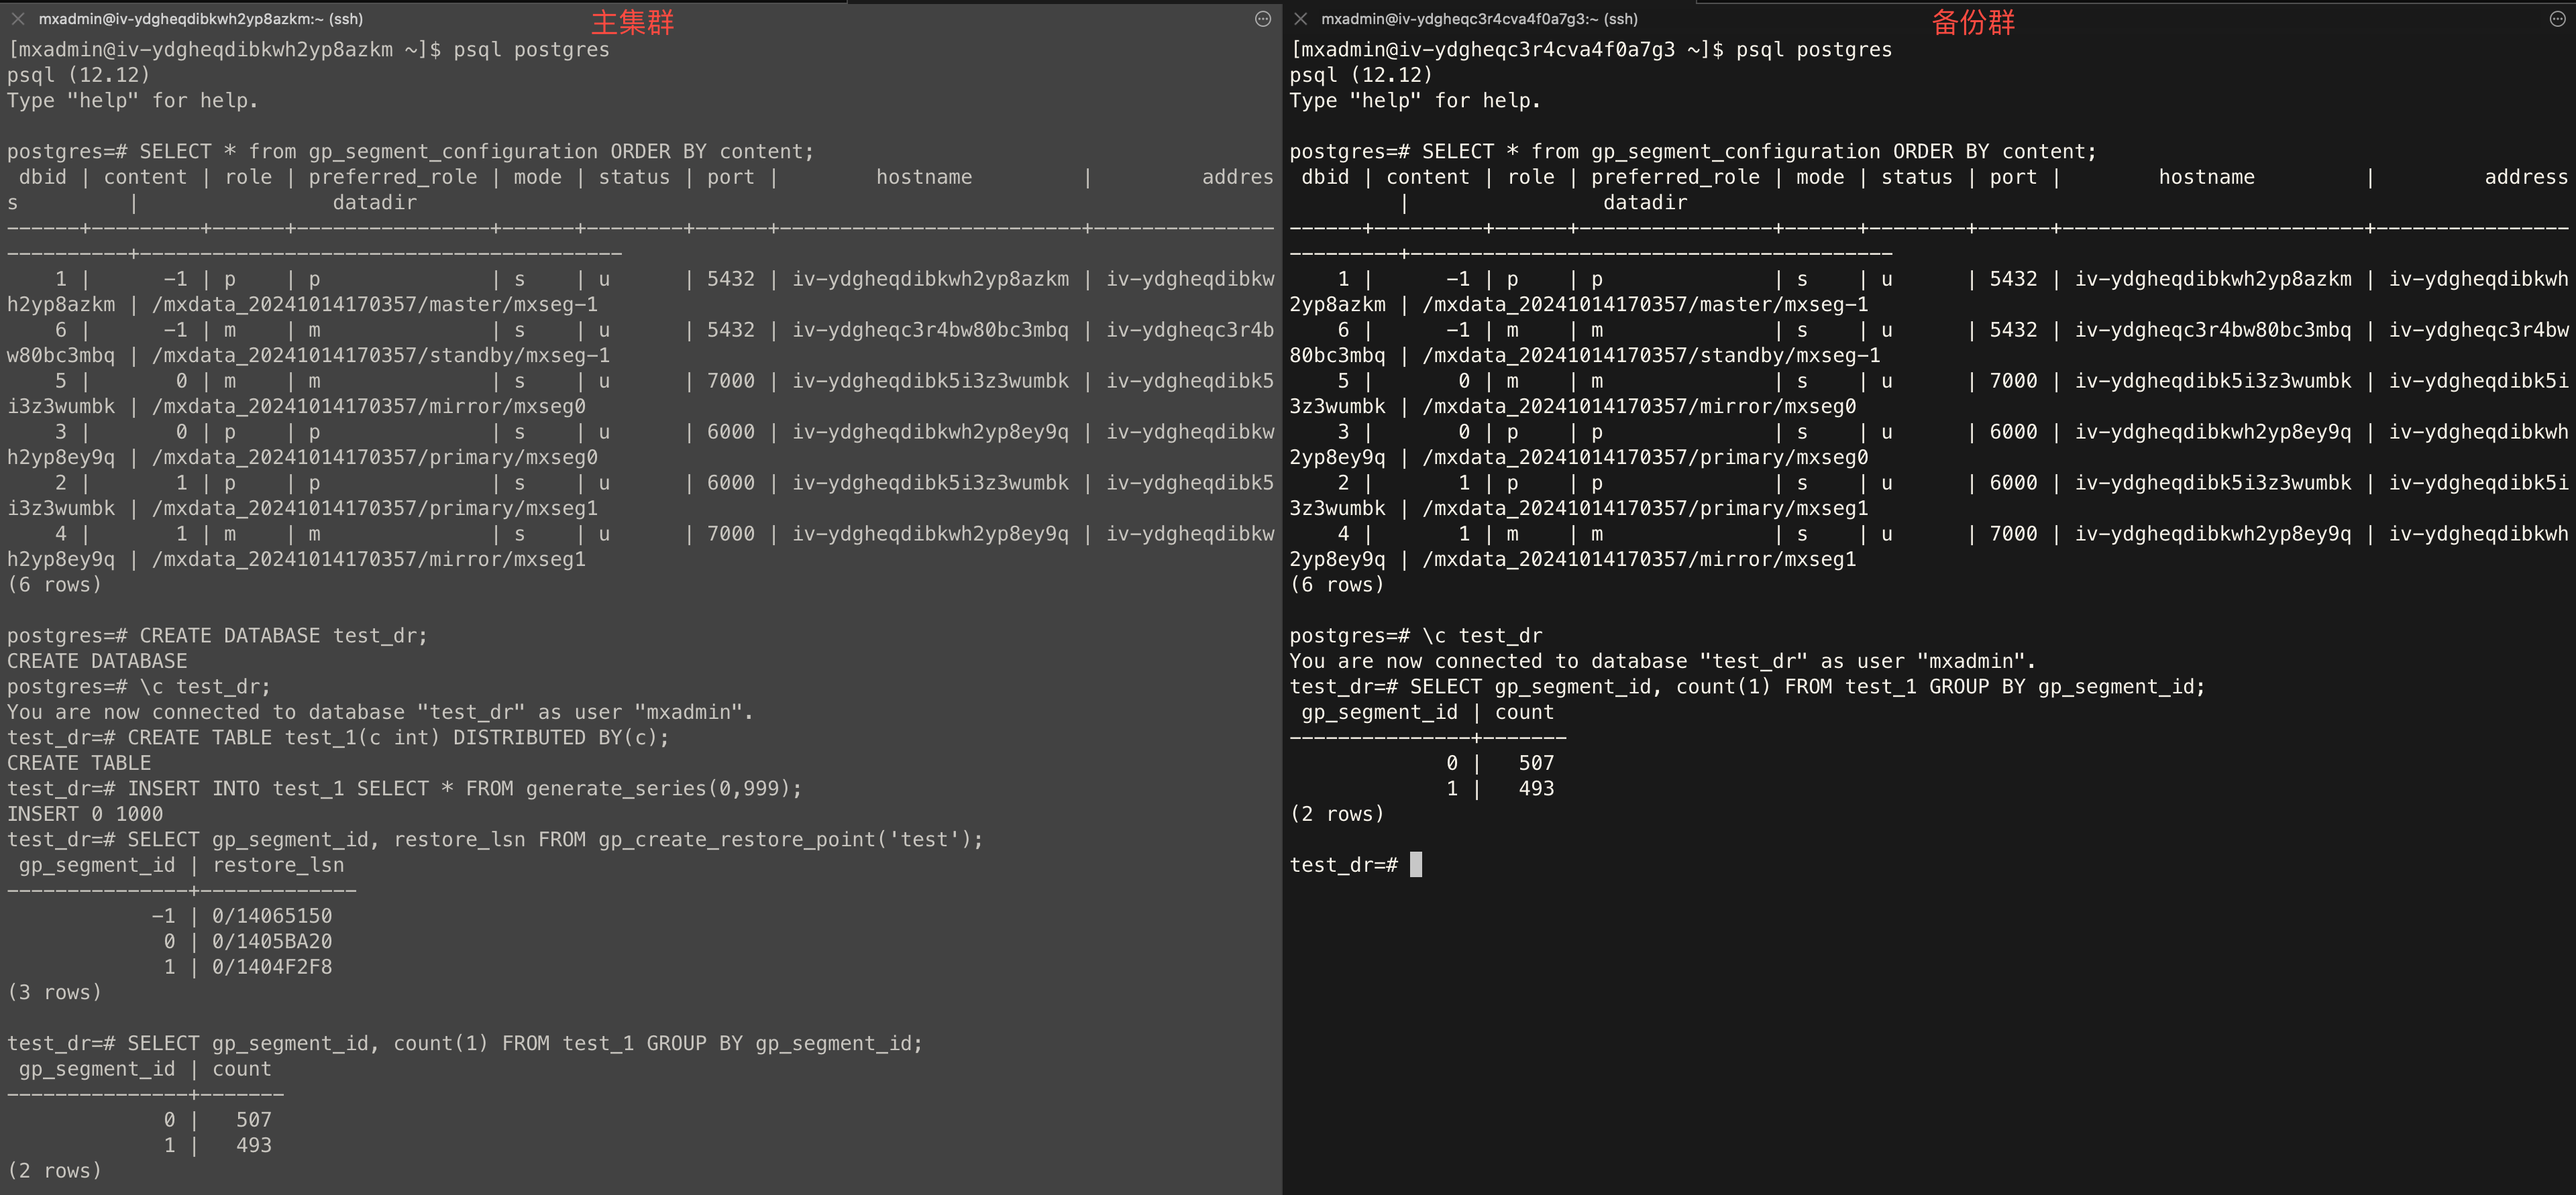
SELECT * from gp_segment_configuration ORDER BY content, dbid;Create Database
CREATE DATABASE test_dr;Create Table
test_dr database on the primary cluster and run: CREATE TABLE test_1(c int) DISTRIBUTED BY (c);Insert Data
test_dr database on the primary cluster and insert test data: INSERT INTO test_1 SELECT * FROM generate_series(0,999);Create Restore Point
test_dr database on the primary cluster and create a global consistency point: SELECT gp_segment_id, restore_lsn FROM gp_create_restore_point('test');Check Sync Status
test_dr database on both clusters and run: SELECT gp_segment_id, count(1) FROM test_1 GROUP BY gp_segment_id;Example output: