Note! Disaster recovery capability is only available as an experimental feature in YMatrix 6.0.0.
This section describes how to deploy a deployed YMatrix database cluster as the primary cluster for YMatrix disaster recovery functional components and backup clusters.
Before deploying the disaster recovery function, let’s first understand the four concepts contained in the disaster recovery function of the YMatrix database cluster:
YMatrix database cluster YMatrix database cluster refers to a cluster with complete database functions, including high availability components, database components, etc.
Main cluster Main cluster refers to a database cluster that provides data services under normal circumstances or a database cluster that requires disaster recovery data assurance.
Backup the cluster Backup cluster refers to a database cluster that has backed up data from the primary cluster and can provide data recovery or data services in the event of a disaster.
Disaster recovery function components Disaster Recovery Functional Component refers to components that can enable data service switching when data backup and disaster recovery of primary clusters, including Subscriber on the primary cluster side and Publisher on the backup cluster side.
Subscriber
Subscriber is a disaster recovery functional component deployed on the main cluster side, and its functions are:
a. Receive a backup request sent from Publisher on the backup cluster side and send the request to the main cluster.
b. Receive the backup data of the main cluster and send the backup data from the main cluster side to the Publisher on the backup cluster side.
Subscriber should be deployed on a separate machine on the main cluster side and ensure that the machine is connected to the network of all nodes in the main cluster (located in the same subnet).
At the same time, the machine where the Subscriber is located should be able to maintain network connection with the machine where the Publisher is located on the backup cluster side (located in the same subnet).
Publisher
Publisher is a disaster recovery functional component deployed on the backup cluster side, and its functions are:
a. Receive a backup request from the backup cluster side and send the request to the Subscriber of the main cluster.
b. Receive backup data sent by Subscriber on the main cluster side and send the data to the backup cluster.
Publisher should be deployed on a separate machine on the backup cluster side and ensure that the machine is connected to all node networks of the backup cluster (located in the same subnet).
At the same time, the machine where the Publisher is located should be able to maintain network connection with the machine where the Subscriber is located on the main cluster side (located in the same subnet).
Backup the cluster
When the backup cluster is run as a backup role, it will back up all data from the main cluster asynchronously or synchronously, and supports read-only data operations.
When a disaster recovery switch occurs, the backup cluster becomes a full-featured YMatrix database cluster, providing full-type data operations.
Note: The backup cluster currently does not contain high availability features, that is, there is only one copy per data shard.
Deploy disaster recovery function, the main cluster GUC synchronous_commit only supports four values: off (recommended), local, remote_apple, and on.
synchronous_commit parameter as a user in the master machine of the main cluster. gpconfig -c synchronous_commit -v <One of the acceptable values>mxstop -u command to reload the configuration to make the parameter modification take effect.The deployed network link is shown in the figure below:
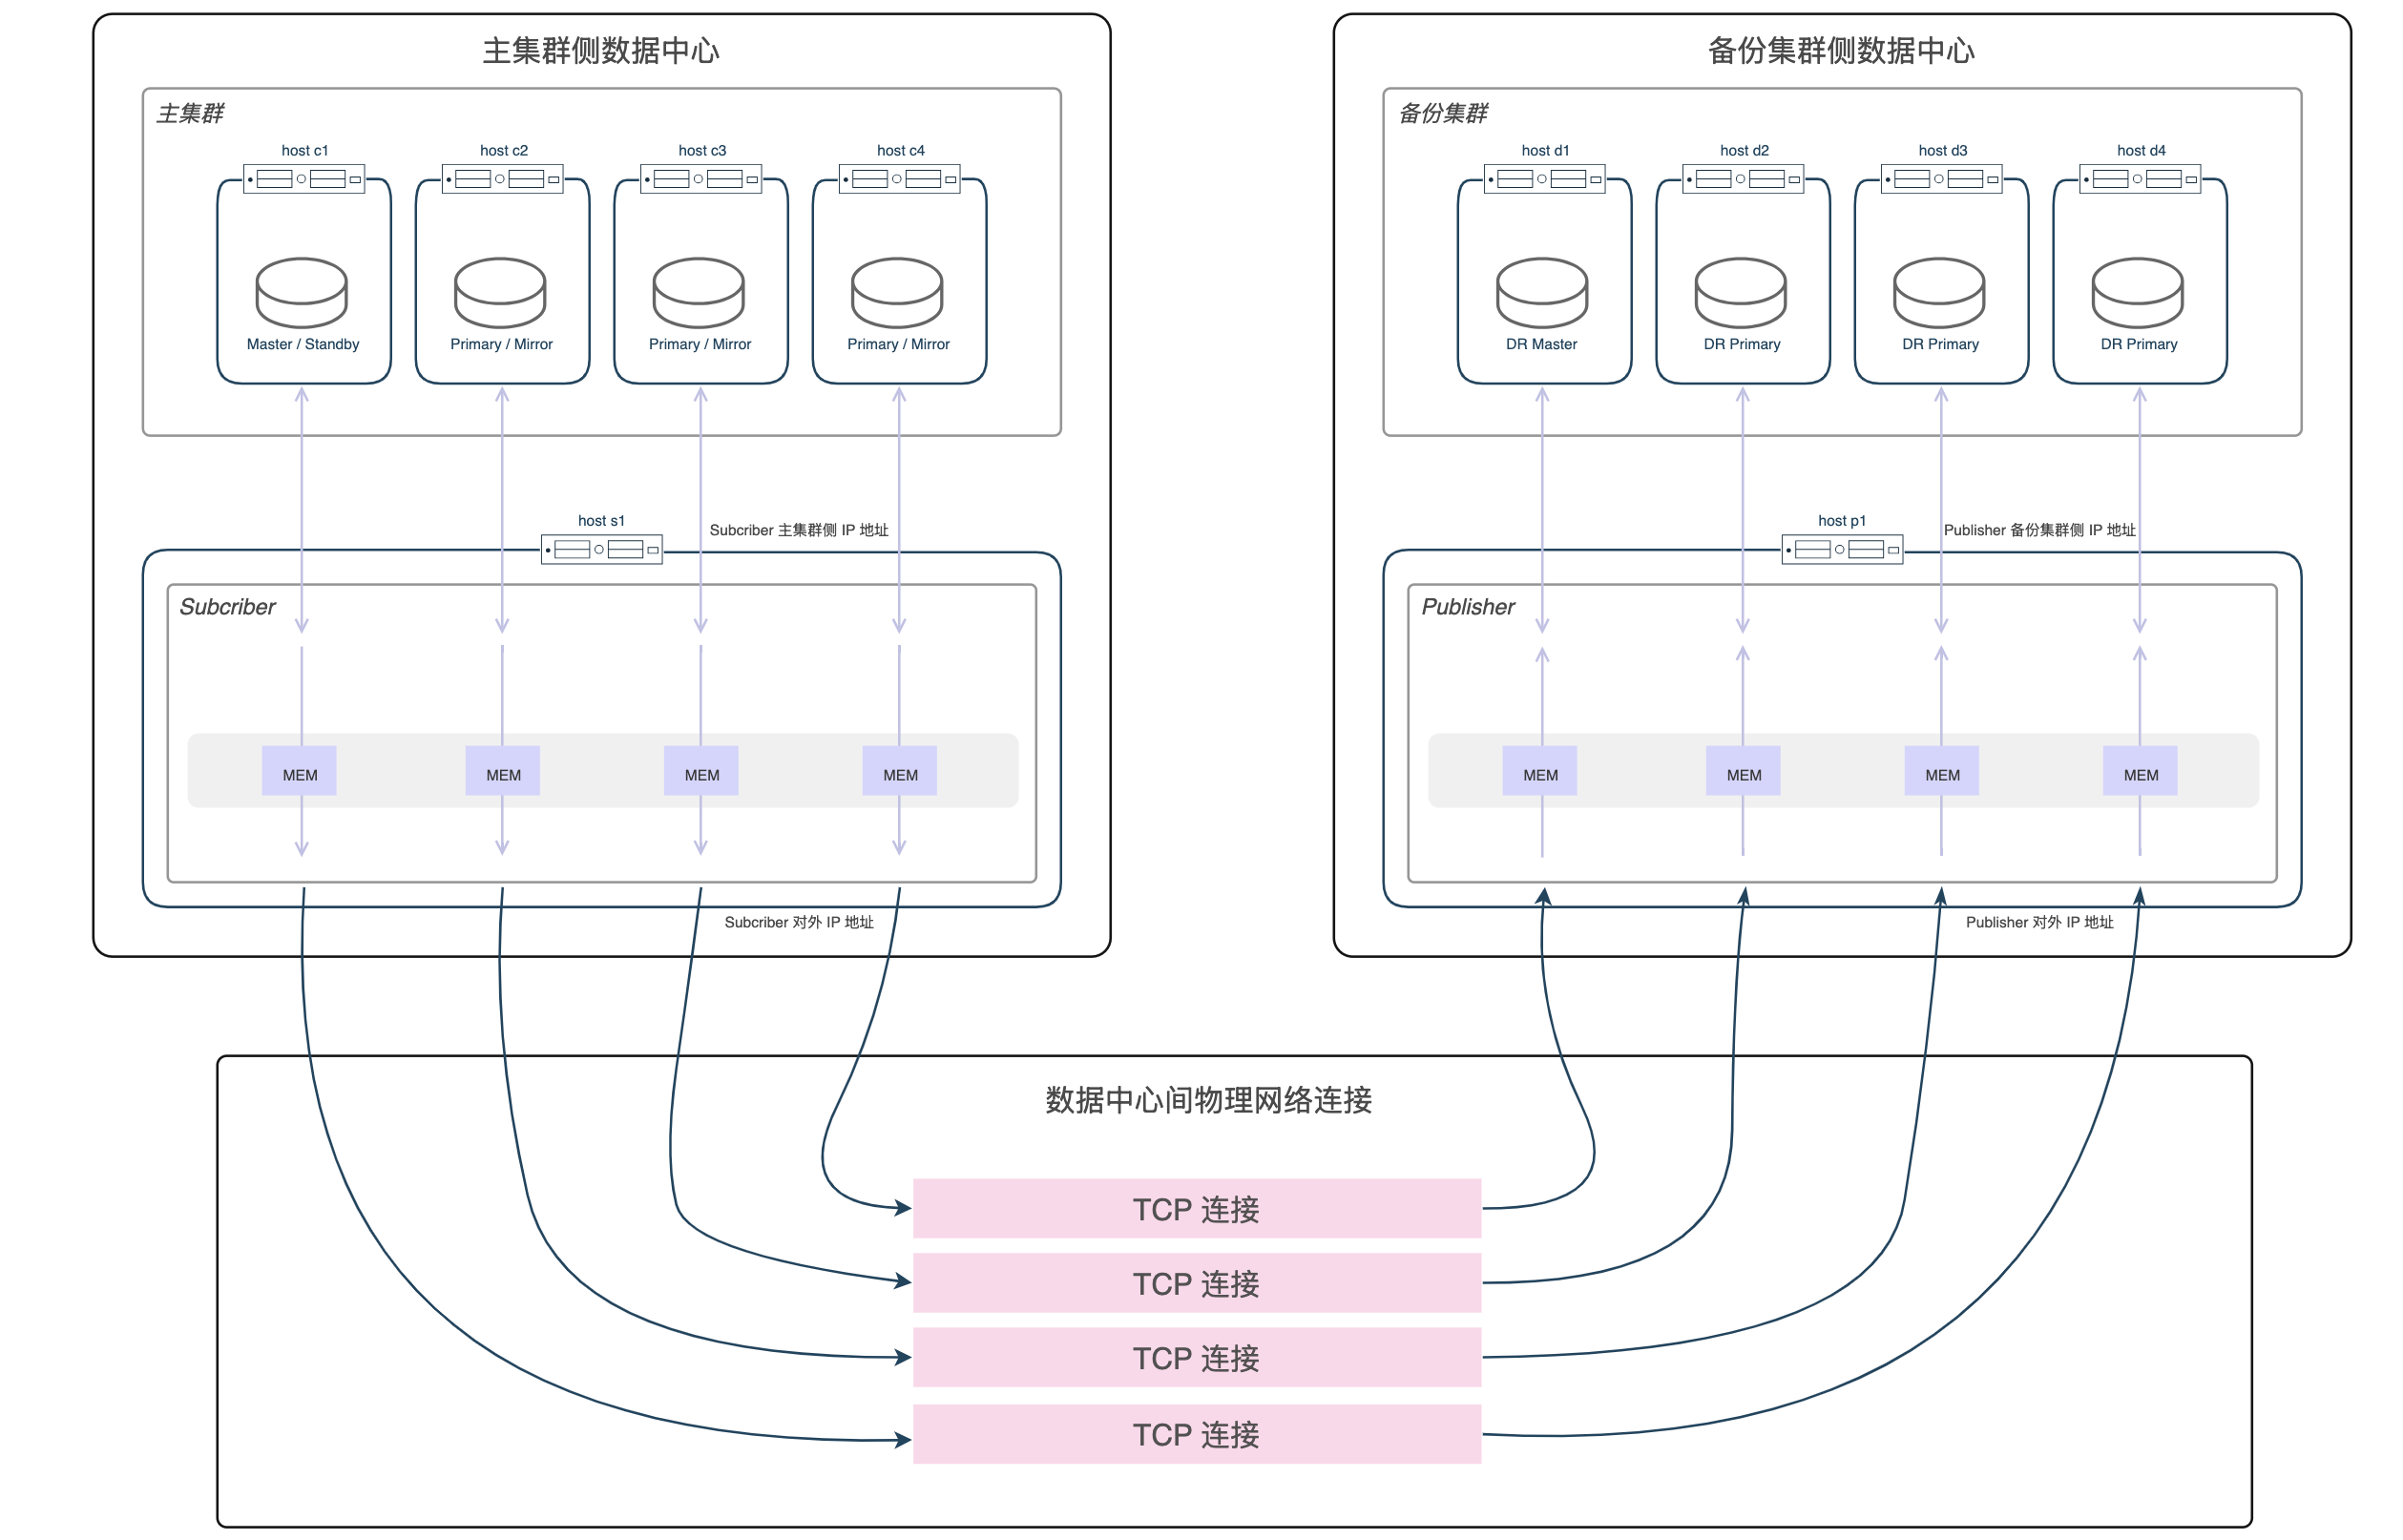
Note: This network environment preparation solution is only applicable to the deployment of a backup cluster to a different data center than the primary cluster. For other deployment situations, appropriate adjustments must be made according to actual deployment requirements.
Note! The YMatrix database software version installed in the backup cluster deployed by the disaster recovery function should be exactly the same as the YMatrix database software version installed in the primary cluster.
The CPU architecture of the backup cluster deployed by the disaster recovery feature should be exactly the same as the CPU architecture of the primary cluster.
Add a Subscriber machine to the main cluster side.
a. Install the same version of YMatrix database software as the primary cluster on the Subscriber machine.
b. Use the root permission to add the newly added Subscriber host name (Subscriber primary cluster IP address) to the /etc/hosts system file on the node on the main cluster side.
c. Create a configuration file directory as the root user on the machine where the master cluster is located.
mkdir ~/subscriberAnd execute the following command.
  # Initialize expand
  /opt/ymatrix/matrixdb6/bin/mxctl expand init \
  > ~/subscriber/expand.init

  # Add subscriber machine
  cat ~/subscriber/expand.init | \
  /opt/ymatrix/matrixdb6/bin/mxctl expand add --host {{subscriber Hostname or IP address on the main cluster side}} \
  > ~/subscriber/expand.add

  #Conduct network interoperability checks
  cat ~/subscriber/expand.add | \
  /opt/ymatrix/matrixdb6/bin/mxctl expand netcheck \
  > ~/subscriber/expand.nc

  # Generate plan
  cat ~/subscriber/expand.nc | \
  /opt/ymatrix/matrixdb6/bin/mxbox deployer expand --physical-cluster-only \
  > ~/subscriber/expand.plan

  # Execute plan
  cat ~/subscriber/expand.plan | \
  /opt/ymatrix/matrixdb6/bin/mxbox deployer exec
d. Edit the pg_hba.conf files for all segments (master, standby, and primary and mirror) in the main cluster. Before "#user access rules" (preferably before the first non-trust rule), add the following line. Used to trust the replication link from Subscriber.
host all,replication mxadmin {{subscriber IP address on the main cluster side}}/32 truste. On the master machine of the primary cluster, as the mxadmin user, execute the following command to reload the configuration file for the primary cluster to take effect.
/opt/ymatrix/matrixdb6/bin/mxstop -uSubscriber configuration file
a. On the Subscriber machine, create a configuration file directory as the mxadmin user.
mkdir ~/subscriberb. Create the Subscriber configuration file ~/subscriber/sub.conf as the mxadmin user according to the following template.
 # ~/subscriber/sub.conf
 module = 'subscriber'
 perf_port = 5587
 verbose = true # The log level is based on actual needs
 debug = false # log level according to actual needs

 [[receiver]]
 type = 'db'
 cluster_id = '' # main cluster cluster_id
 host = '' # hostname or IP of master
 port = 4617 # master supervisor listening port number
 dbname = 'postgres'
 username = 'mxadmin'
 resume_mode = 'default'
 restore_point_creation_interval_minute = '3' # Data consistency is guaranteed through restore point
                                                           # This controls the time interval for creating a restore point
                                                           # Adjust according to customer needs
                                                           # Default is 5 minutes
 slot = 'internal_disaster_recovery_rep_slot' # Deprecated option (reserved for the time being)

 [[sender]]
 type = 'socket'
 port = 9320 # subscriber's listening port
Supervisor configuration file
a. Create a subscriber.conf configuration file subscriber.conf hosted by supervisor as the root user.
 # /etc/matrixdb/service/subscriber.conf
 [program:subscriber]
   process_name=subscriber
   command=%(ENV_MXHOME)s/bin/mxdr -s <COUNT> -c /home/mxadmin/subscriber/sub.conf
   directory=%(ENV_MXHOME)s/bin
   autostart=true
   autorestart=true
   stopsignal=TERM
   stdout_logfile=/home/mxadmin/gpAdminLogs/subscriber.log
   stdout_logfile_maxbytes=50MB
   stdout_logfile_backups=10
   redirect_stderr=true
   user=mxadmin
Where <COUNT> is the number of shards in the main cluster, which can be obtained by executing the following command.
SELECT count(1) FROM gp_segment_configuration WHERE role='p'Run and manage Subscriber using supervisor
a. On the Subscriber machine, as the root user, execute the following command to host Subscriber in supervisor.
 /opt/ymatrix/matrixdb6/bin/supervisorctl update
/opt/ymatrix/matrixdb6/bin/supervisorctl start subscriberInstall the same version of YMatrix database software as the primary cluster on the Publisher and backup cluster machines and install the dependencies.
Use the root permission on the node on the backup cluster side to add the newly added Publisher host name (Publisher primary cluster side IP address) to the /etc/hosts system file.
On the Publisher machine, create a configuration file directory as the root user.
mkdir ~/publisherProduction mapping configuration file
On the master machine of the primary cluster, execute the following SQL command to generate the template /tmp/mapping.tmp for the backup cluster shard mapping configuration file.
 COPY (
     SELECT content, hostname, port, datadir
     FROM gp_segment_configuration
     WHERE role='p'
     ORDER BY content
 ) TO '/tmp/mapping.tmp' DELIMITER '|'
Modify the generated files according to actual conditions. The first column of the file is the main cluster content id, and there is no need to modify it; the last three columns are backup cluster information and need to be modified according to actual conditions. Their meanings are host name, primary port number and data directory. You can execute the following command to view detailed instructions.
mxbox deployer dr pub configAfter the modification is completed, move the file to the ~/publisher directory of the root user of the Publisher machine.
The modification example is as follows:
| Before modification | After modification |
|---|---|
 |
 |
Publisher configuration file
According to the following template, create the Publisher configuration file ~/Publisher/pub.conf as the root user in the Publisher machine.
   # ~/publisher/pub.conf
     module = 'publisher'
     perf_port = 6698
     verbose = true # The log level is based on actual needs
     debug = false # log level according to actual needs

     [[receiver]]
     type = 'socket'
     host = '' # subscriber IP address, that is, the above "subscriber external IP address"
     port = 9320 # subscriber's listening port

     [[sender]]
     type = 'db'
     host = '127.0.0.1'
     listen = 6432 # publisher Listen to the basic port, the range varies with the number of shards
     username = 'mxadmin'
     dbname = 'postgres'
     dir = '/tmp' # Temporary information storage directory during operation
     schedule = 'disable' # disable M2 scheduler
Deploy the backup cluster
On the machine where Publisher is located, as the root user, follow the steps below to execute the command.
a. collect
This step collects machine information for the backup cluster.
  # Collect master machine information
  /opt/ymatrix/matrixdb6/bin/mxctl setup collect --host {{Backup cluster master machine IP}} \
  > ~/publisher/collect.1

  # Collect other information about the segment machine to be deployed
  cat ~/publisher/collect.1 | \
  /opt/ymatrix/matrixdb6/bin/mxctl setup collect --host {{Backup cluster other machines IP}} \
  > ~/publisher/collect.2

  ...

  # Collect other information about the segment machine to be deployed
  cat~/publisher/collect.n-1 | \
  /opt/ymatrix/matrixdb6/bin/mxctl setup collect --host {{Backup cluster other machines IP}} \
  > ~/publisher/collect.n

  # Collect information about the publisher's machine
  cat~/publisher/collect.n | \
  /opt/ymatrix/matrixdb6/bin/mxctl setup collect --host {{publisher machine IP}} \
  > ~/publisher/collect.nc
b. netcheck
This step will check the network connectivity between machines on the backup cluster side.
cat ~/publisher/collect.nc | \
/opt/ymatrix/matrixdb6/bin/mxctl setup netcheck \
> ~/publisher/plan.nc
c. plan
This step will deploy Publisher.
/opt/ymatrix/matrixdb6/bin/mxbox deployer dr pub plan \
  --wait \
  --enable-redo-stop-pit \
  --collect-file ~/publisher/plan.nc \
  --mapping-file ~/publisher/mapping.conf \
  --publisher-file ~/publisher/pub.conf \
> ~/publisher/plan
Note! Be sure to set
--enable-redo-stop-pit, which is an option to ensure the final consistency of backup cluster data.
d. setup
/opt/ymatrix/matrixdb6/bin/mxbox deployer dr pub setup \
--plan-file ~/publisher/planExecute the following command as the root user on each primary machine in the main cluster.
ps aux | grep postgres | grep walsenderThere should be a process connected to subscriber and the process is in the streaming state, as shown below:

On the machine where Subscriber is located, execute the following command as the mxadmin user.
supervisorctl statusA process named subscriber should exist and is in the Running state, as shown below:

On the machine where Publisher is located, execute the following command as the mxadmin user.
supervisorctl statusThere should be a process with the name prefix publisher and it is in the Running state. The example is as follows:

On the backup cluster, as the root user, execute the following command.
ps aux | grep postgres | grep walreceiverThere should be a process connected to subscriber and the process is in the streaming state, as shown below:

Note: In the backup cluster, the sum of the number of walreceiver processes should be the same as the number of shards in the original cluster.
The specific operation steps are as follows:
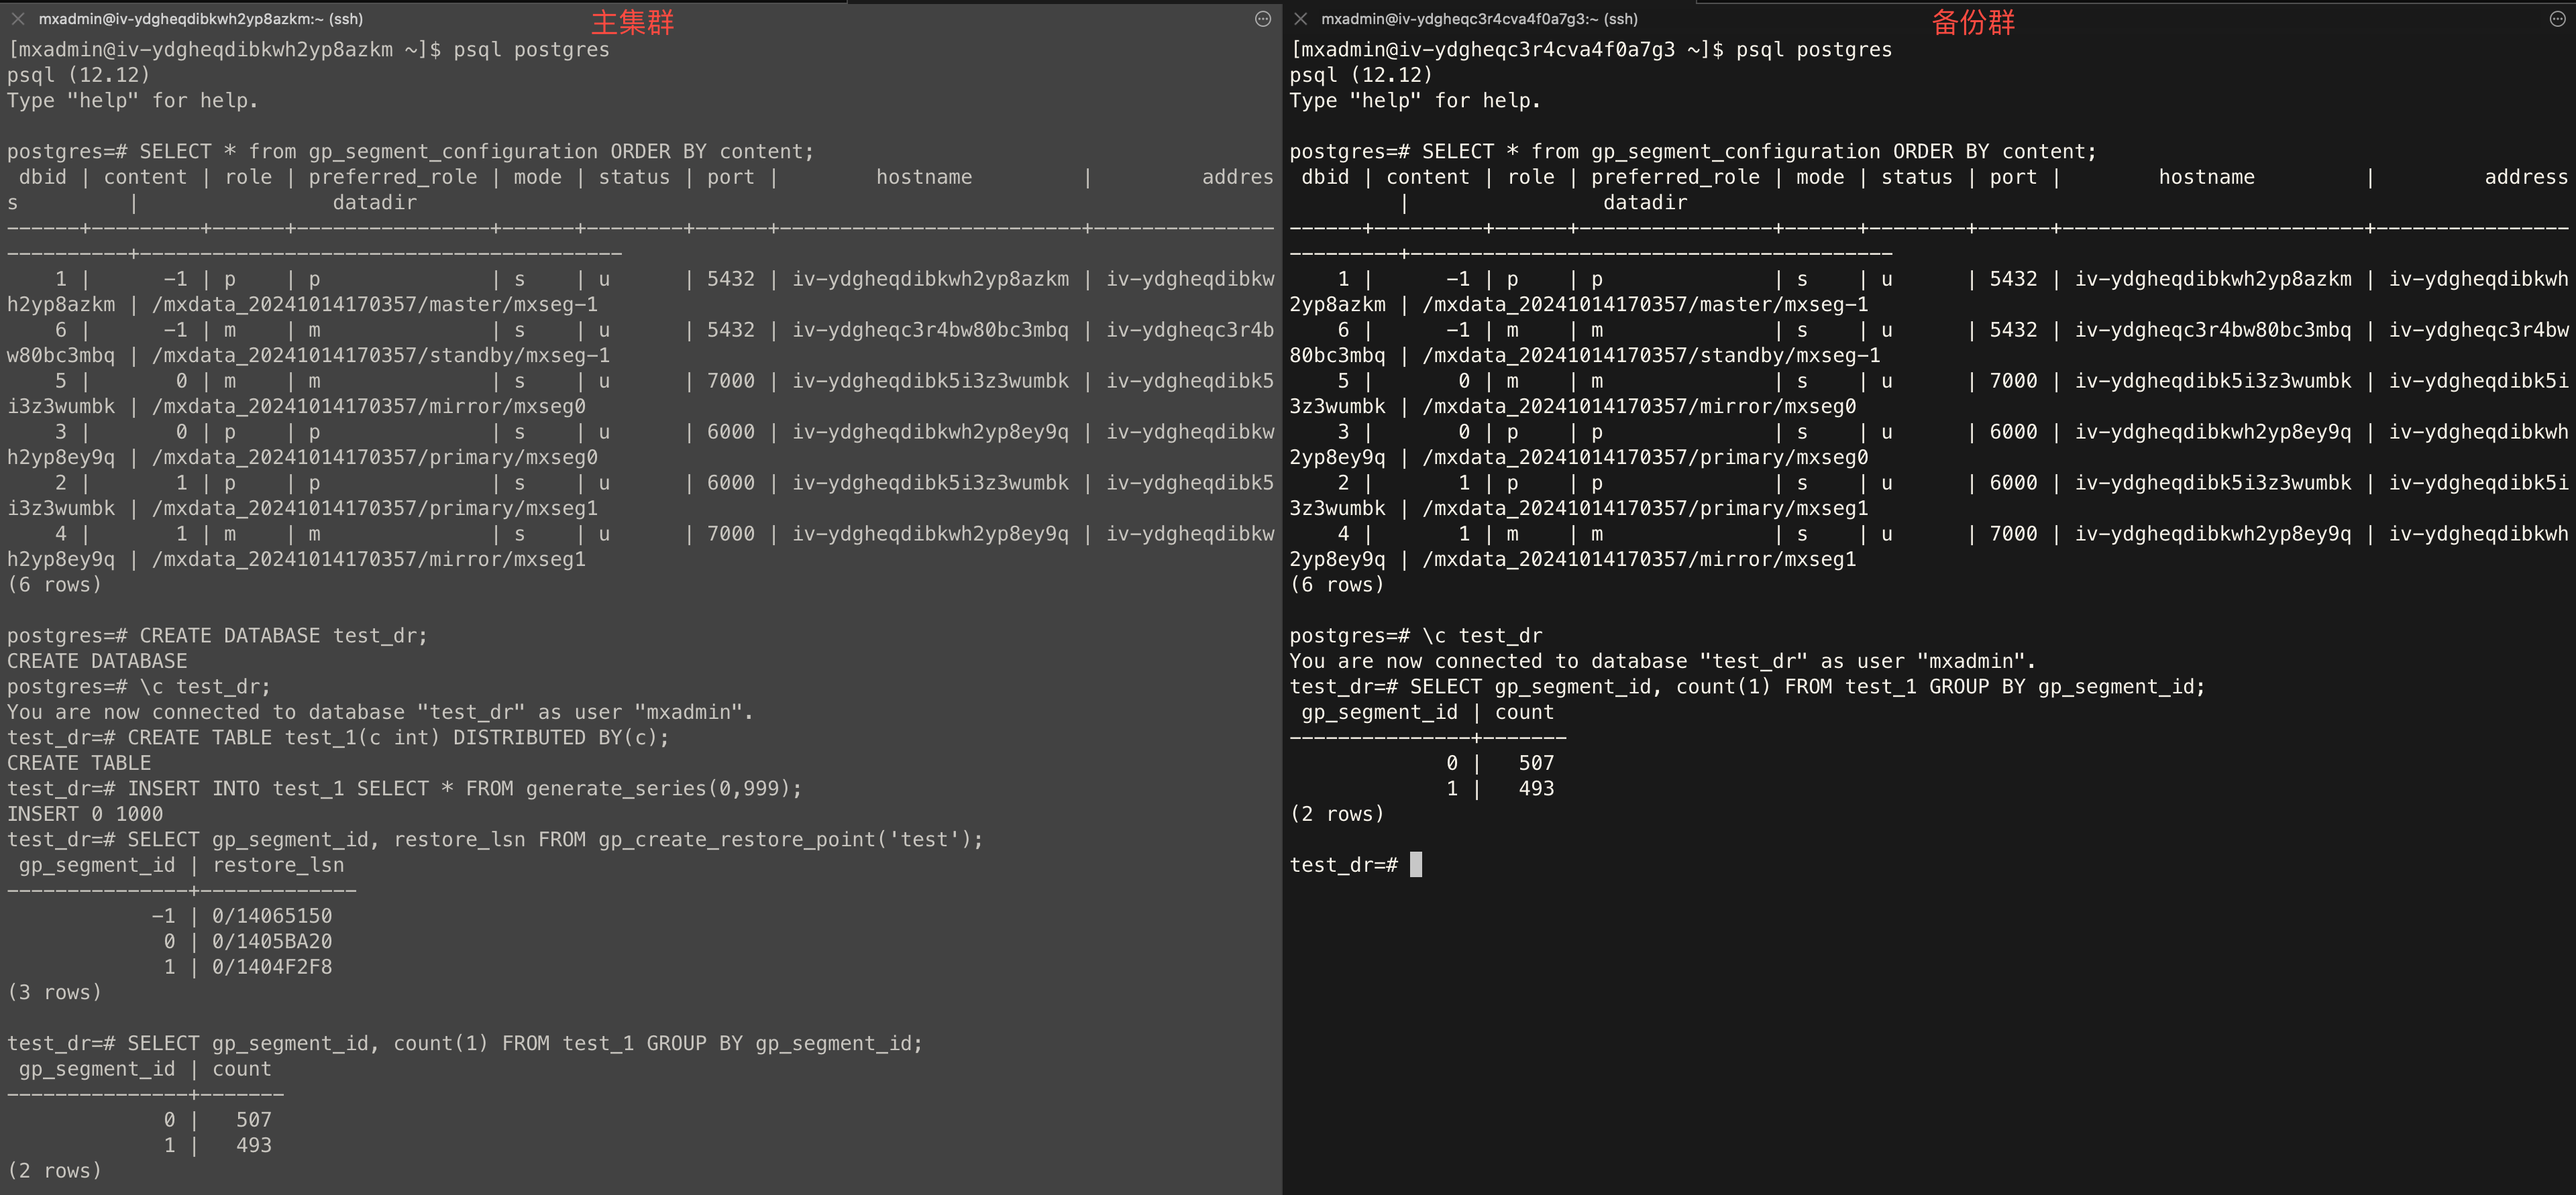
SELECT * from gp_segment_configuration ORDER BY content, dbid; CREATE DATABASE test_dr;test_dr library of the main cluster, execute the following statement, and create the test test_1 data table. CREATE TABLE test_1(c int) DISTRIBUTED BY (c);test_dr library of the main cluster, execute the following statement, and insert some data into the test_1 data table. INSERT INTO test_1 SELECT * FROM generate_series(0,999);test_dr library of the main cluster, execute the following statement, and create a global consistency point test. SELECT gp_segment_id, restore_lsn FROM gp_create_restore_point('test');test_dr library of the main backup cluster separately, execute the following statement to check whether the results of the two are consistent. SELECT gp_segment_id, count(1) FROM test_1 GROUP BY gp_segment_id;Examples are as follows: