For distributed databases with massive storage, as the amount of data increases, insufficient cluster capacity and computing power is inevitable, so capacity expansion operations are indispensable. In MatrixDB, you can freely choose to use graphical interface to operate capacity expansion or command line online capacity expansion.
Notes!
When you want to expand capacity, you need to install the same MatrixDB as the current database cluster version for the newly added node in advance. You can use theSELECT VERSION ()statement to view it.
When you click the expansion button in the upper right corner of the "Cluster Management" page, you will enter a description page for expansion, which describes the steps, timing, and some preparations before expansion. Through these, you can learn in detail what capacity expansion is and the impact of capacity expansion.

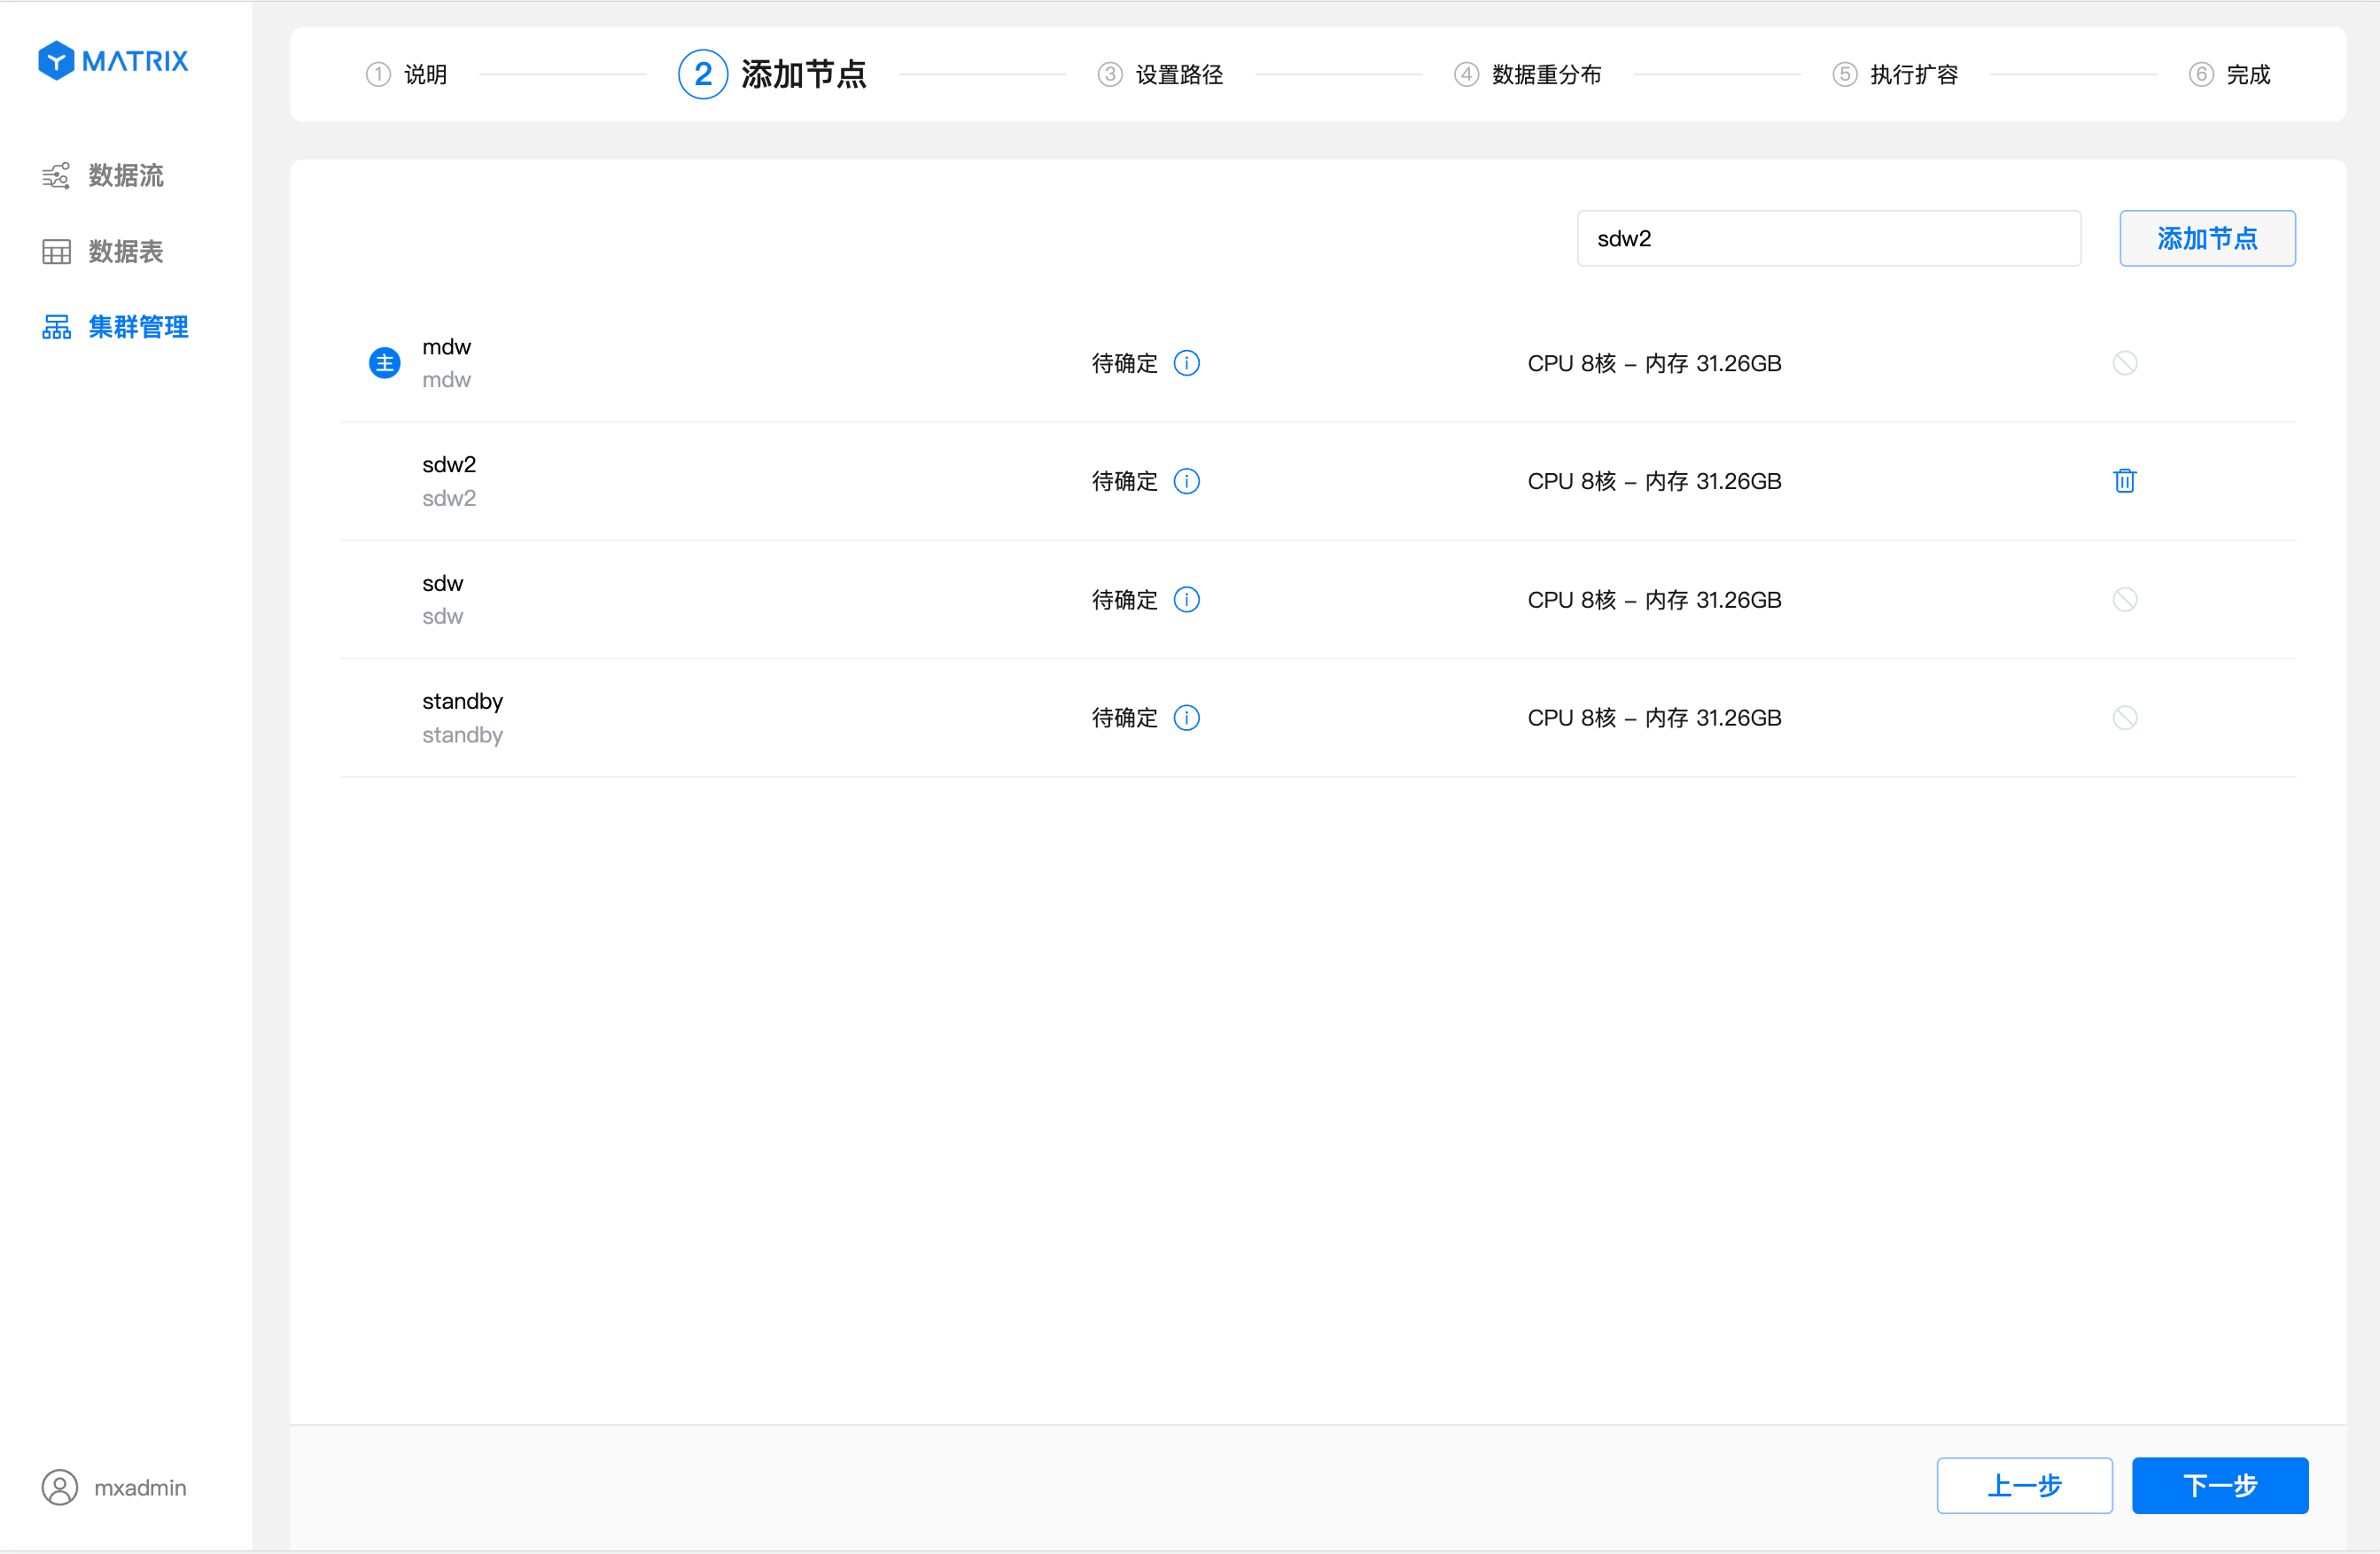
Click the "Add Node" button and enter the ID of the prepared node in the input box (can be host name, FQDN, or IP). 
Enter the ID of the prepared node (can be host name, FQDN or IP) in the input box in the upper right corner, and click the "Add Node" button 
As shown in the figure, the operation of adding nodes is successful, and the newly added nodes will be located below the main node in turn. If you want to delete a node, click the icon to the right of the newly added node to delete it.
After successfully adding a node, click "Next" to enter the settings path page. On the settings path page, you can set the storage path for the newly added nodes.
Notes!
The newly added nodes currently using the graphical interface are data nodes, so you can set multiple storage paths for this node.

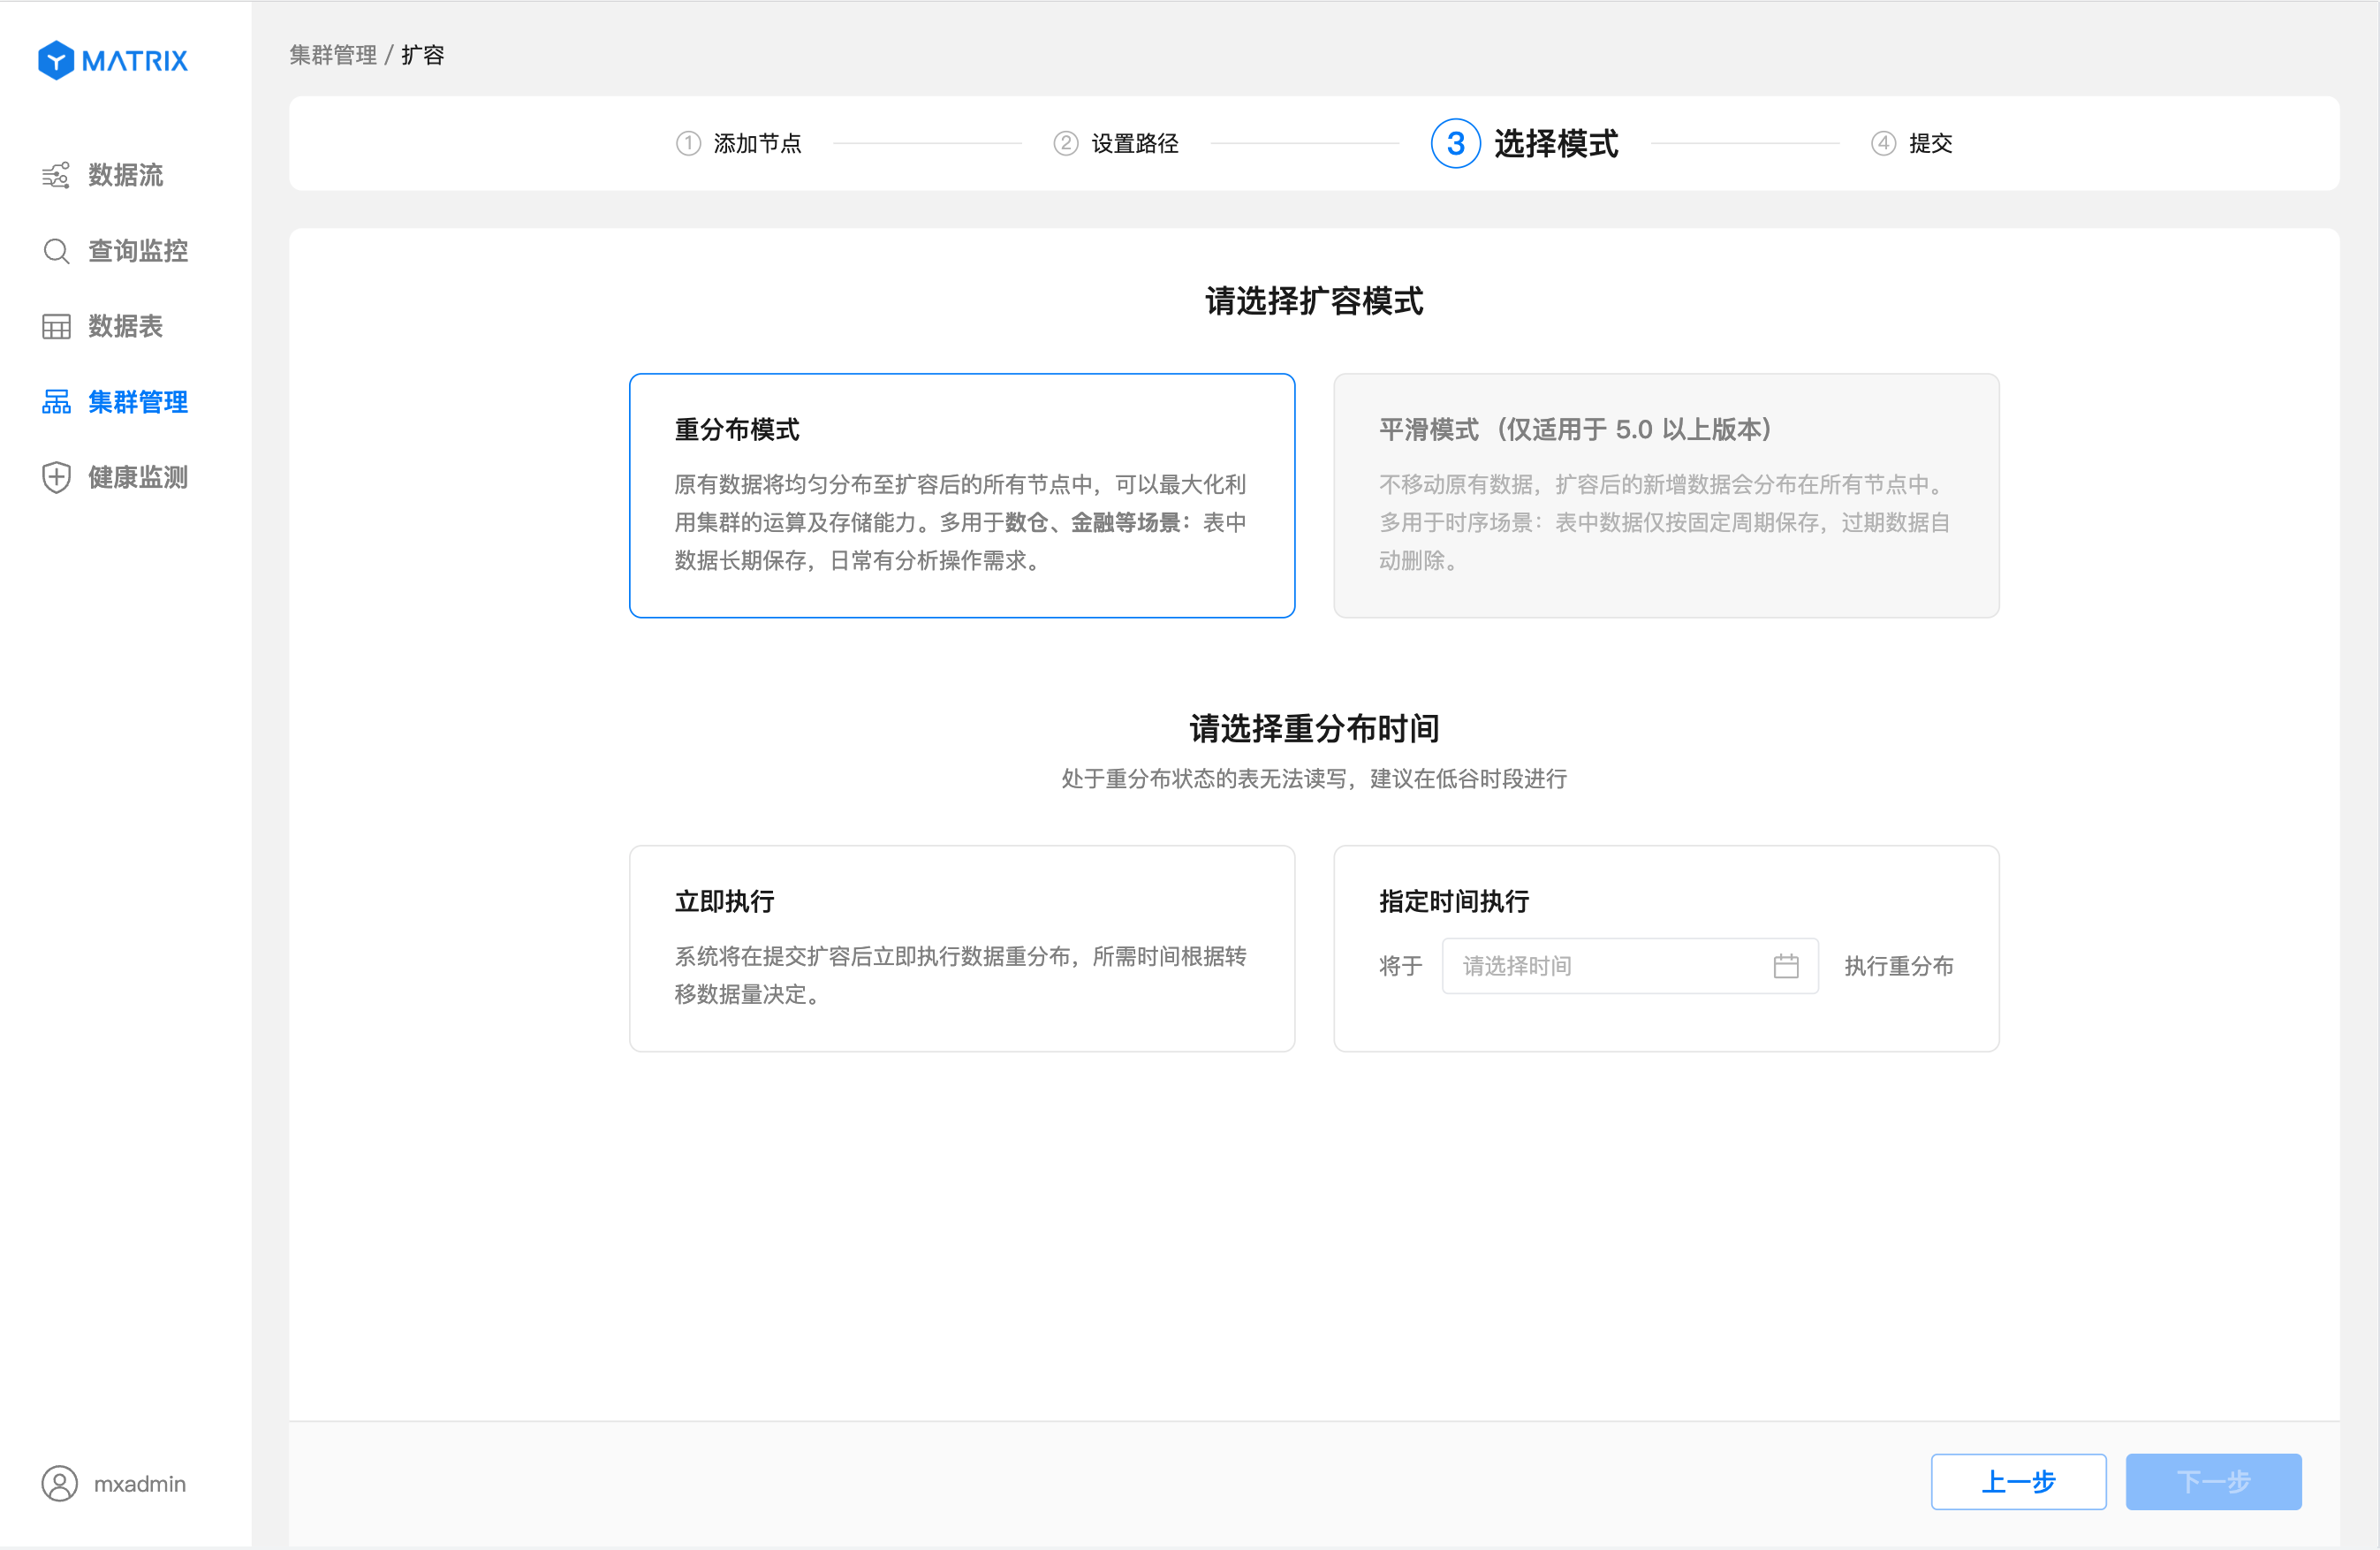
After setting the path, click "Next" to enter the expansion mode selection page and select the redistribution mode. Smooth expansion is supported in version 5.0.
After setting up the expansion mode, click "Next" to enter the execution expansion page. On this page, you can view the execution information of the expansion. 
After clicking the "Submit" button in the lower right corner, the system will officially start adding nodes and prompt after completing the operation. 
Congratulations, you successfully completed a cluster expansion operation.
Notes!
When there is a data redistribution task, the expansion button of the cluster management page cannot be clicked again.
The main contents include:
The online expansion of the command line is divided into two steps:
This link adds a new data node (segment) to the cluster and starts to use it, but the original table data is still stored on the old node.
To add a new node, you must first provide a deployment plan configuration file. The file can be written manually or automatically generated using the gpexpand tool. It is recommended to use the automatic generation method.
Execute gpexpand:
[mxadmin@mdw ~]$ gpexpand
......
Please refer to the Admin Guide for more information.

Would you like to initiate a new System Expansion Yy|Nn (default=N):
Enter y to enter:
> yThen ask to enter the new node host name and split it with comma:
Enter a comma separated list of new hosts you want
to add to your array.  Do not include interface hostnames.
**Enter a blank line to only add segments to existing hosts**[]:
> sdw3,sdw4
Confirm that the new host name is connected to the network and that mutual trust has been established with the original node. And make sure
rsyncis installed
How many additional machines are added to each node? The value entered here is how many segments are added based on the number of segments deployed by the original node. If the number of nodes deployed by each host is the same as the original host, just enter 0 directly.
How many new primary segments per host do you want to add? (default=0):
> 0

Generating configuration file...

20211102:14:36:24:024562 gpexpand:mdw:mxadmin-[INFO]:-Generating input file...

Input configuration file was written to 'gpexpand_inputfile_20211102_143624'.

Please review the file and make sure that it is correct then re-run
with: gpexpand -i gpexpand_inputfile_20211102_143624

20211102:14:36:24:024562 gpexpand:mdw:mxadmin-[INFO]:-Exiting...
After the execution, the gpexpand_inputfile_20211102_143624 configuration file will be generated in the current directory:
[mxadmin@mdw ~]$ cat gpexpand_inputfile_20211102_143624
sdw3|sdw3|7002|/home/mxadmin/gpdemo/datadirs/dbfast1/demoDataDir3|5|3|p
sdw3|sdw3|7003|/home/mxadmin/gpdemo/datadirs/dbfast2/demoDataDir4|6|4|p
sdw3|sdw3|7004|/home/mxadmin/gpdemo/datadirs/dbfast3/demoDataDir5|7|5|p
sdw4|sdw4|7002|/home/mxadmin/gpdemo/datadirs/dbfast1/demoDataDir6|8|6|p
sdw4|sdw4|7003|/home/mxadmin/gpdemo/datadirs/dbfast2/demoDataDir7|9|7|p
sdw4|sdw4|7004|/home/mxadmin/gpdemo/datadirs/dbfast3/demoDataDir8|10|8|p
The configuration file contains new host information, as well as new Segment port number, data directory, dbid, role and other information. This information corresponds to the gp_segment_configuration table. The configuration file can also be written manually in this format.
After preparing the configuration file, perform the following operation to add a new node:
[mxadmin@mdw ~]$ gpexpand -i gpexpand_inputfile_20211102_143624

......
20211102:14:54:03:025371 gpexpand:mdw:mxadmin-[INFO]:-Unlocking catalog
20211102:14:54:03:025371 gpexpand:mdw:mxadmin-[INFO]:-Unlocked catalog
20211102:14:54:03:025371 gpexpand:mdw:mxadmin-[INFO]:-Creating expansion schema
20211102:14:54:03:025371 gpexpand:mdw:mxadmin-[INFO]:-Populating gpexpand.status_detail with data from database postgres
20211102:14:54:03:025371 gpexpand:mdw:mxadmin-[INFO]:-Populating gpexpand.status_detail with data from database template1
20211102:14:54:03:025371 gpexpand:mdw:mxadmin-[INFO]:-Populating gpexpand.status_detail with data from database mxadmin
20211102:14:54:03:025371 gpexpand:mdw:mxadmin-[INFO]:-************************************************
20211102:14:54:03:025371 gpexpand:mdw:mxadmin-[INFO]:-Initialization of the system expansion complete.
20211102:14:54:03:025371 gpexpand:mdw:mxadmin-[INFO]:-To begin table expansion onto the new segments
20211102:14:54:03:025371 gpexpand:mdw:mxadmin-[INFO]:-rerun gpexpand
20211102:14:54:03:025371 gpexpand:mdw:mxadmin-[INFO]:-************************************************
20211102:14:54:03:025371 gpexpand:mdw:mxadmin-[INFO]:-Exiting...
After successful execution, query the gp_segment_configuration table and you will see that the new node has been joined.
The second step in online expansion is to redistribute the table data to the new node because there is no data on the newly added segment.
MatrixDB supports three distribution methods: random, hash, and replication, and they must be synchronized to the new segment according to the rules. Among them, the replicated table must still be stored in the newly added segment; the hash table must be redistributed according to the rules; the random table will not be migrated because the data distribution is irregular, but the newly inserted data will fall on the new segment according to the probability.
After the first phase is completed, a schema: gpexpand will be created in the postgres database, including the expansion status information:
postgres=# \d
                     List of relations
  Schema  |        Name        | Type  |  Owner  | Storage
----------+-----------------------------------------------------------------------------------------------------------------------
 gpexpand | expansion_progress | view  | mxadmin |
 gpexpand | status             | table | mxadmin | heap
 gpexpand | status_detail      | table | mxadmin | heap
(3 rows)
Among them, the status_detail table records all tables that need to be redistributed and redistributed status:
postgres=# select * from gpexpand.status_detail ;
 dbname  |   fq_name   | table_oid | root_partition_name | rank | external_writable |   status    | expansion_started | expansion_finished | source_bytes
---------+--------------------------------------------------------------------------------------------------------------------------------------------------------------------------------------------------------------------------------------------------------
 mxadmin | public.t2   |     16388 |                     |    2 | f                 | NOT STARTED |                   |                    |         8192
 mxadmin | public.t1   |     16385 |                     |    2 | f                 | NOT STARTED |                   |                    |        16384
 mxadmin | public.disk |     16391 | public.disk         |    2 | f                 | NOT STARTED |                   |                    |            0
(3 rows)
Run gpexpand directly to perform table redistribution:
[mxadmin@mdw ~]$ gpexpand
......
gpexpand:mdw:mxadmin-[INFO]:-Querying gpexpand schema for current expansion state
20211102:15:18:27:026291 gpexpand:mdw:mxadmin-[INFO]:-Expanding mxadmin.public.t2
20211102:15:18:27:026291 gpexpand:mdw:mxadmin-[INFO]:-Finished expanding mxadmin.public.t2
20211102:15:18:27:026291 gpexpand:mdw:mxadmin-[INFO]:-Expanding mxadmin.public.t1
20211102:15:18:27:026291 gpexpand:mdw:mxadmin-[INFO]:-Finished expanding mxadmin.public.t1
20211102:15:18:27:026291 gpexpand:mdw:mxadmin-[INFO]:-Expanding mxadmin.public.disk
20211102:15:18:27:026291 gpexpand:mdw:mxadmin-[INFO]:-Finished expanding mxadmin.public.disk
20211102:15:18:32:026291 gpexpand:mdw:mxadmin-[INFO]:-EXPANSION COMPLETED SUCCESSFULLY
20211102:15:18:32:026291 gpexpand:mdw:mxadmin-[INFO]:-Exiting...
After the table redistribution is completed, query the status_detail table and you will see that the status has become COMPLETED:
postgres=# select * from gpexpand.status_detail ;
 dbname  |   fq_name   | table_oid | root_partition_name | rank | external_writable |  status   |     expansion_started      |     expansion_finished     | source_bytes
---------+--------------------------------------------------------------------------------------------------------------------------------------------------------------------------------------------------------------------------------------------------------
 mxadmin | public.t2   |     16388 |                     |    2 | f                 | COMPLETED | 2021-11-02 15:18:27.326247 | 2021-11-02 15:18:27.408379 |         8192
 mxadmin | public.t1   |     16385 |                     |    2 | f                 | COMPLETED | 2021-11-02 15:18:27.431481 | 2021-11-02 15:18:27.507591 |        16384
 mxadmin | public.disk |     16391 | public.disk         |    2 | f                 | COMPLETED | 2021-11-02 15:18:27.531727 | 2021-11-02 15:18:27.570559 |            0
(3 rows)
If you want to increase the redistribution concurrency, you can add the -B parameter when executing the gpexpand command. The default value is 16 and the upper limit is 128, such as:
[mxadmin@mdw ~]$ gpexpand -B 32After the redistribution is complete, run gpexpand -c to clean up the intermediate table of the expansion process:
[mxadmin@mdw ~]$ gpexpand -c
20211102:15:24:41:026524 gpexpand:mdw:mxadmin-[INFO]:-local Greenplum Version: 'postgres (MatrixDB) 5.0.0-enterprise~alpha (Greenplum Database) 7.0.0 build dev'
20211102:15:24:41:026524 gpexpand:mdw:mxadmin-[INFO]:-master Greenplum Version: 'PostgreSQL 12 (MatrixDB 5.0.0-enterprise~alpha) (Greenplum Database 7.0.0 build dev) on x86_64-pc-linux-gnu, compiled by gcc (GCC) 7.3.1 20180303 (Red Hat 7.3.1-5), 64-bit compiled on Oct 25 2021 15:24:16'
20211102:15:24:41:026524 gpexpand:mdw:mxadmin-[INFO]:-Querying gpexpand schema for current expansion state


Do you want to dump the gpexpand.status_detail table to file? Yy|Nn (default=Y):
> n
20211102:15:24:46:026524 gpexpand:mdw:mxadmin-[INFO]:-Removing gpexpand schema
20211102:15:24:46:026524 gpexpand:mdw:mxadmin-[INFO]:-Cleanup Finished.  exiting...
At this point, the expansion was successful.
After performing redistribution, the system will automatically generate the following system directories (including system tables, system views, etc.) and store them in the matrixmgr_internal mode of the matrixmgr database.
| Field Name | Type | Description |
| --- | --- |
| status | text | Track the status of a capacity expansion operation, the valid value is:
SCHEDULED START, which refers to the time when the redistribution is made to begin.
SETUP, which represents the start time when the database data table information is collected
SETUP DONE, which refers to the time when the data table information is collected
EXPANSION STARTED, which refers to the time when the data redistribution is officially started
COMPLETED, which refers to the time when all redistribution tasks are completed
LAST SCHEDULED START, which refers to the time when all redistribution tasks are completed, save the value of SCHEDULED START to LAST SCHEDULED START, and then clear SCHEDULED START |
| updated_at | timestamp with time zone | Timestamp for the last state change |
| Field Name | Type | Description |
| --- | --- |
| dbname | text | Name of the database to which the table belongs |
| db_oid | oid | Oid of the database to which the table belongs |
| fq_name | text | fully qualified name of the table |
| table_oid | oid | table OID |
| root_partition_name | text | For partition tables, it is the name of the root partition. Otherwise it is None |
| rank | int | Level determines the order in which the table is expanded. The expansion tool will be sorted on the rank, and tables with small numbers will be processed first |
| external_writable | boolean | Identify whether the table is an external writable table. (External writable tables require different syntax to expand capacity) |
| status | text | The current expansion status of this table. Valid values are:
NOT STARTED
IN PROGRESS
PENDING
RETRYING
COMPLETED
FAILED |
| expansion_started_at | timestamp with time zone | timestamp at which the expansion of this table begins |
| expansion_finished_at | timestamp with time zone | timestamp for the expansion of this table. This time stamp will also be updated if the expansion fails |
| source_bytes | numeric | The amount of data that has not been redistributed. Due to the table expansion in the HEAP table and the number of segments after expansion, the expanded size will also be different from the source table. This table provides progress information and estimates the duration of the expansion process |
| failed_times | integer | Retry times, default value is 5 |
| Field Name | Type | Description |
| --- | --- |
| name | text | The metric name that describes the expansion process, including:
Bytes Pending
Bytes in Progress
Bytes Done
Bytes Failed
Estimated Expansion Rate
Estimated Remaining Time
Done Tables Number
Pending Tables Number
In Progress Tables Number
Failed Tables Number |
| value | text | The value of the above indicator. For example, Bytes Pending: 100023434 |
For detailed usage methods of gpexpand, please refer to Document