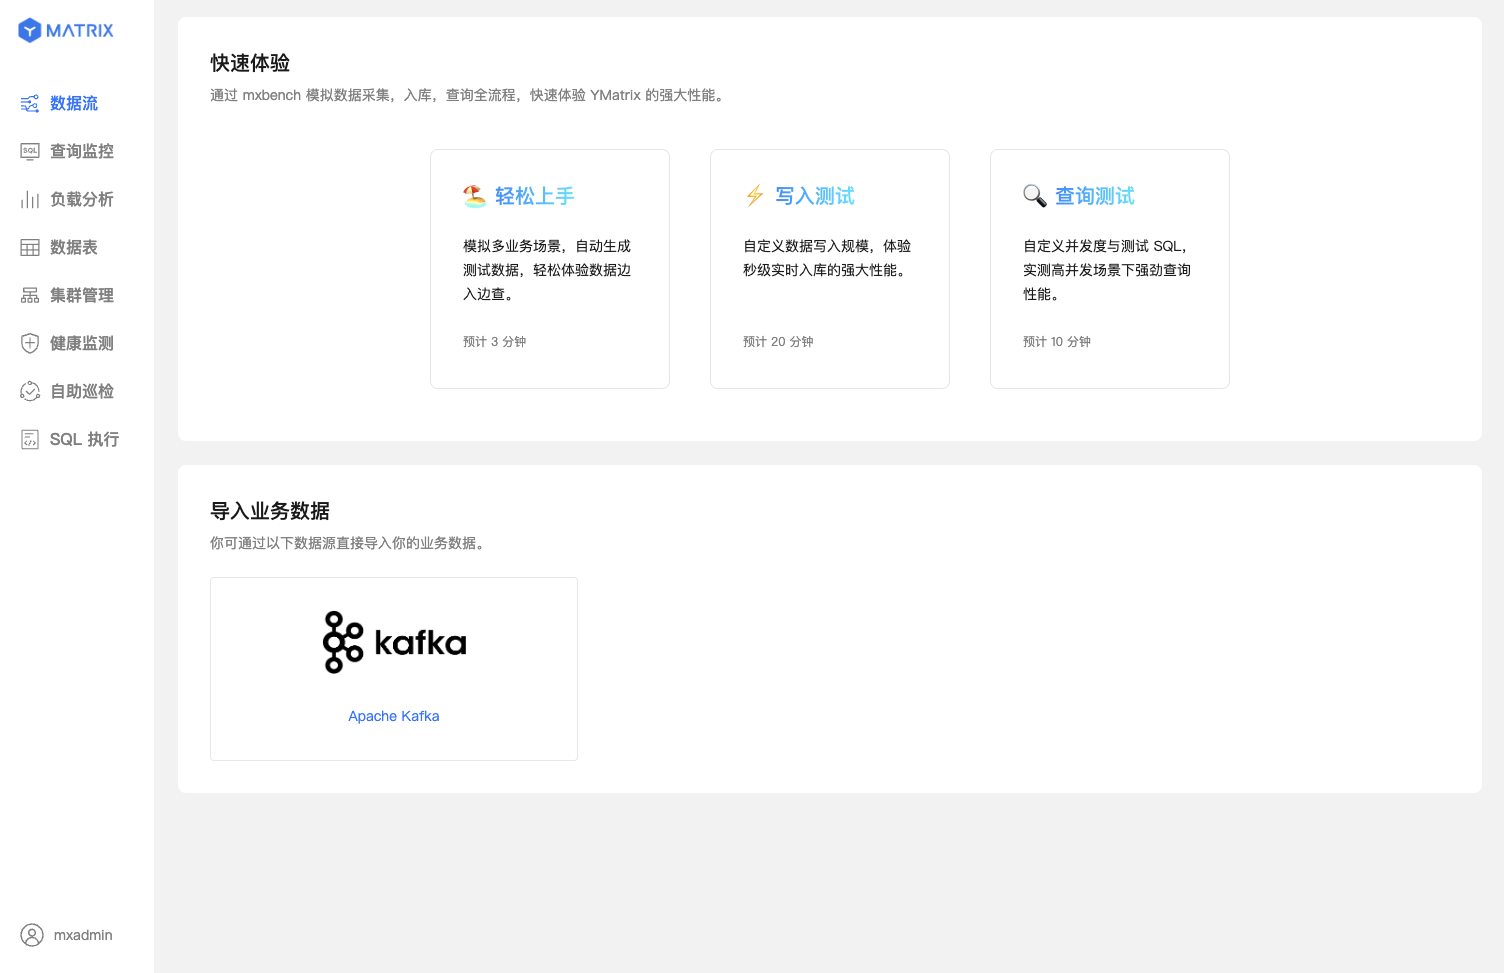
Apache Kafka is an open source distributed event streaming platform. It can be considered as a message system that reads and writes streaming data to help publish and subscribe to messages; it can also be used to write scalable streaming applications to deal with real-time response scenarios; it can also be connected to the database to safely store streaming data in a distributed, replica backup, and fault-tolerant cluster. It can be said that the "event flow" it produces is the "central nerve" of information data transmission.
If you are planning to use Kafka to write data to your YMatrix cluster, please do not miss this document. The YMatrix database supports Kafka seamless connection function, which can continuously and automatically import Kafka data into YMatrix tables and support graphic interface operations. The data formats currently connected can be CSV and JSON. We will use the simplest example to introduce how to use the YMatrix management platform to access Kafka data.
First of all, you need to build a healthy Kafka environment, refer to the official guide Kafka Quickstart.
Now that you have set up the Kafka environment on the server, you can enter it through the following command or other methods.
$ cd packages/kafka_2.13-3.2.0Then start the Kafka service and create a test topic (Topic), with the default port number 9092.
$ bin/kafka-topics.sh --create --topic csv_test --bootstrap-server localhost:9092Then write several test data in stripes, ending with ctrl-c:
$ bin/kafka-console-producer.sh --topic csv_test --bootstrap-server localhost:9092
>1,Beijing,123.05,true,1651043583,1651043583123,1651043583123456
>2,Shanghai,112.95,true,1651043583,1651043583123,1651043583123456
>3,Shenzhen,100.0,false,1651043583,1651043583123,1651043583123456
>4,Guangxi,88.5,false,1651043583,1651043583123,1651043583123456
>^C
Through the above command, 4 pieces of data are written to the newly created csv_test, which are 4 comma-segmented CSV lines. After the preparation work is completed, the following will introduce how to create a Kafka data stream to import data.
Enter the IP of the machine where MatrixGate is located (the default is the IP of the master node) and port number:
http://<IP>:8240After successful login, you will enter the main interface, which is divided into a process view and a task view. The process view refers to the running MatrixGate processes, while the task view refers to all data import tasks. One MatrixGate process can contain multiple tasks.
Click on "Import Data from Kafka".

Select the Kafka data source. Let's first illustrate the steps using a CSV file as an example.
First, you can either select an existing table or create a new one to serve as the target table for receiving Kafka data.
In the target table field, select an existing table along with the data import mode. Here, we assume the selected table is test under the public schema in the postgres database.
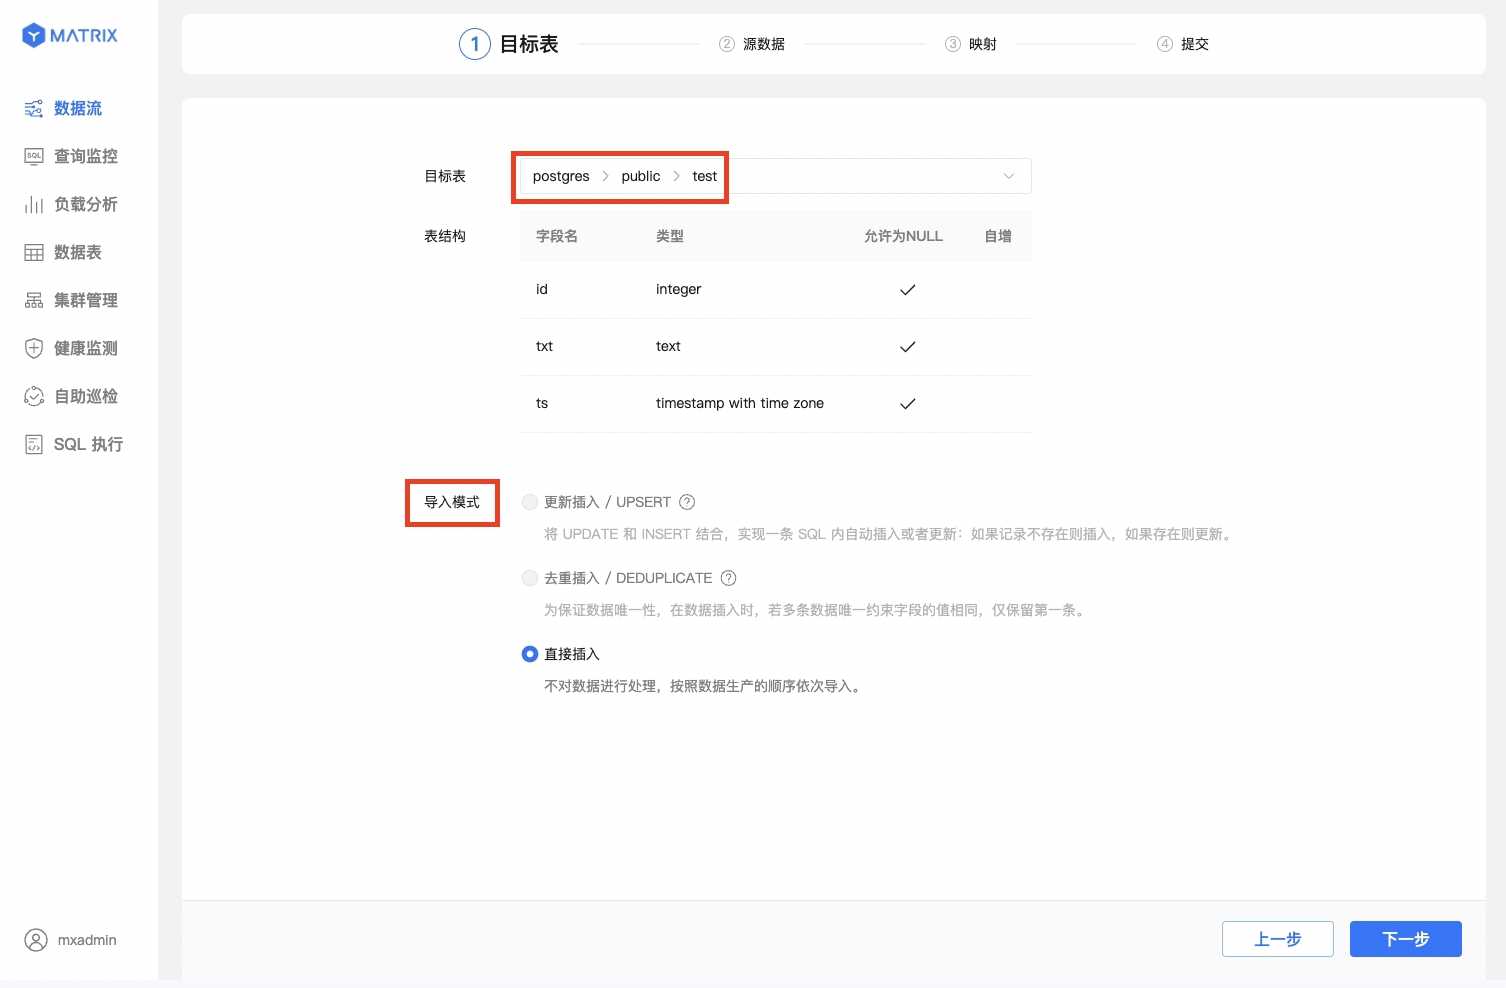
In the target table field, select an existing table along with the data import mode. Here, we assume the selected table is test under the public schema in the postgres database.
Create a new table. Here, we assume the schema is public and the table name is test1.
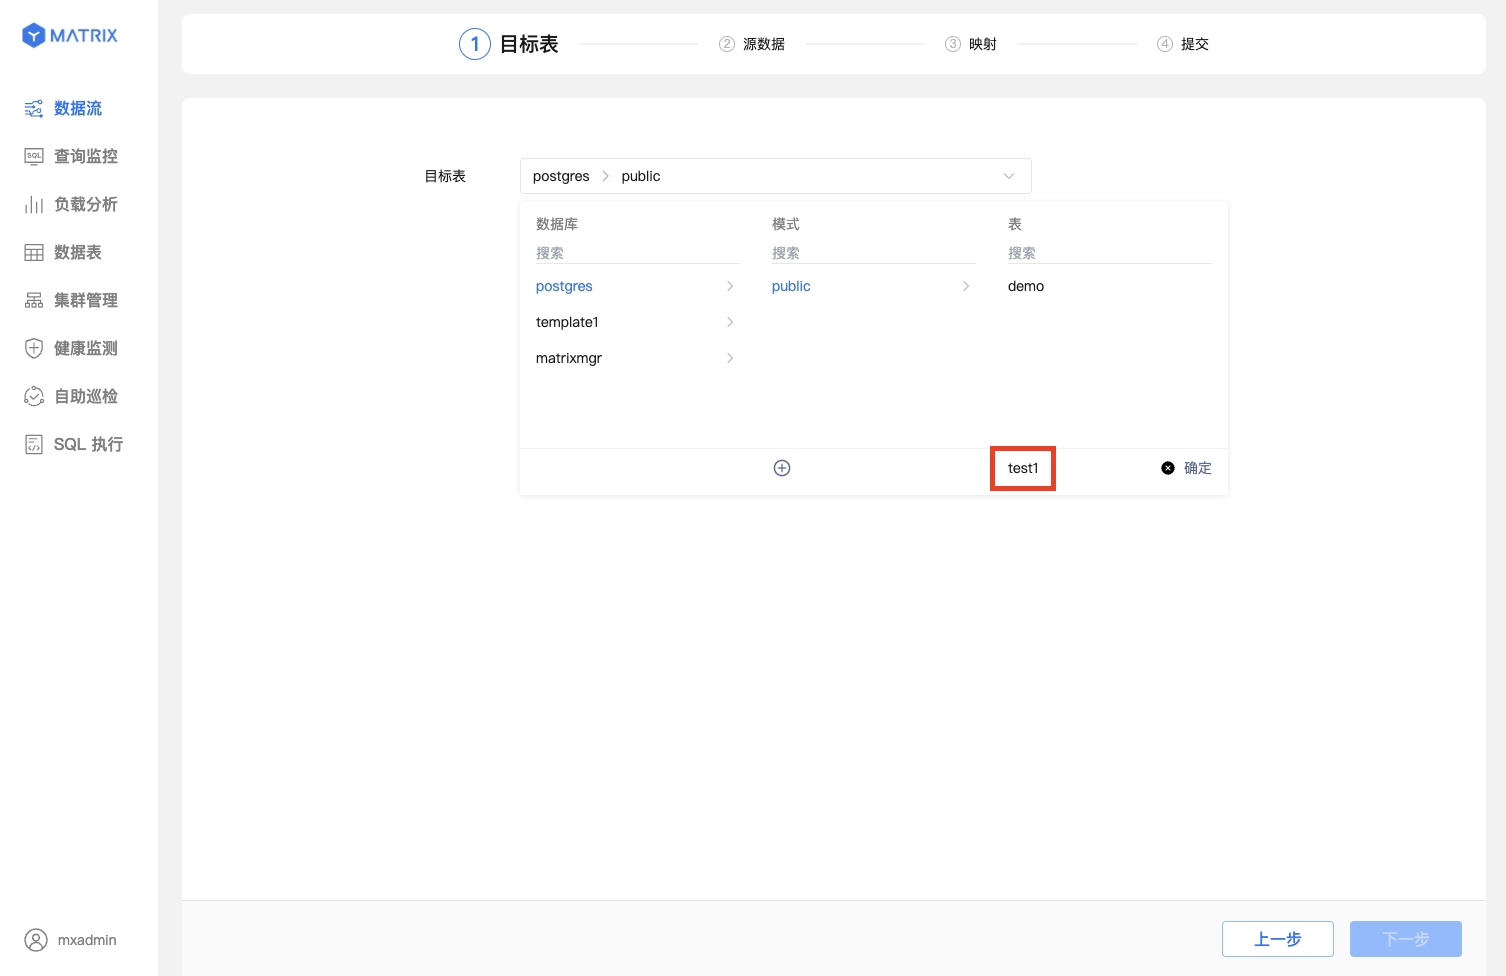
After successful table creation, a red "New" label will appear.
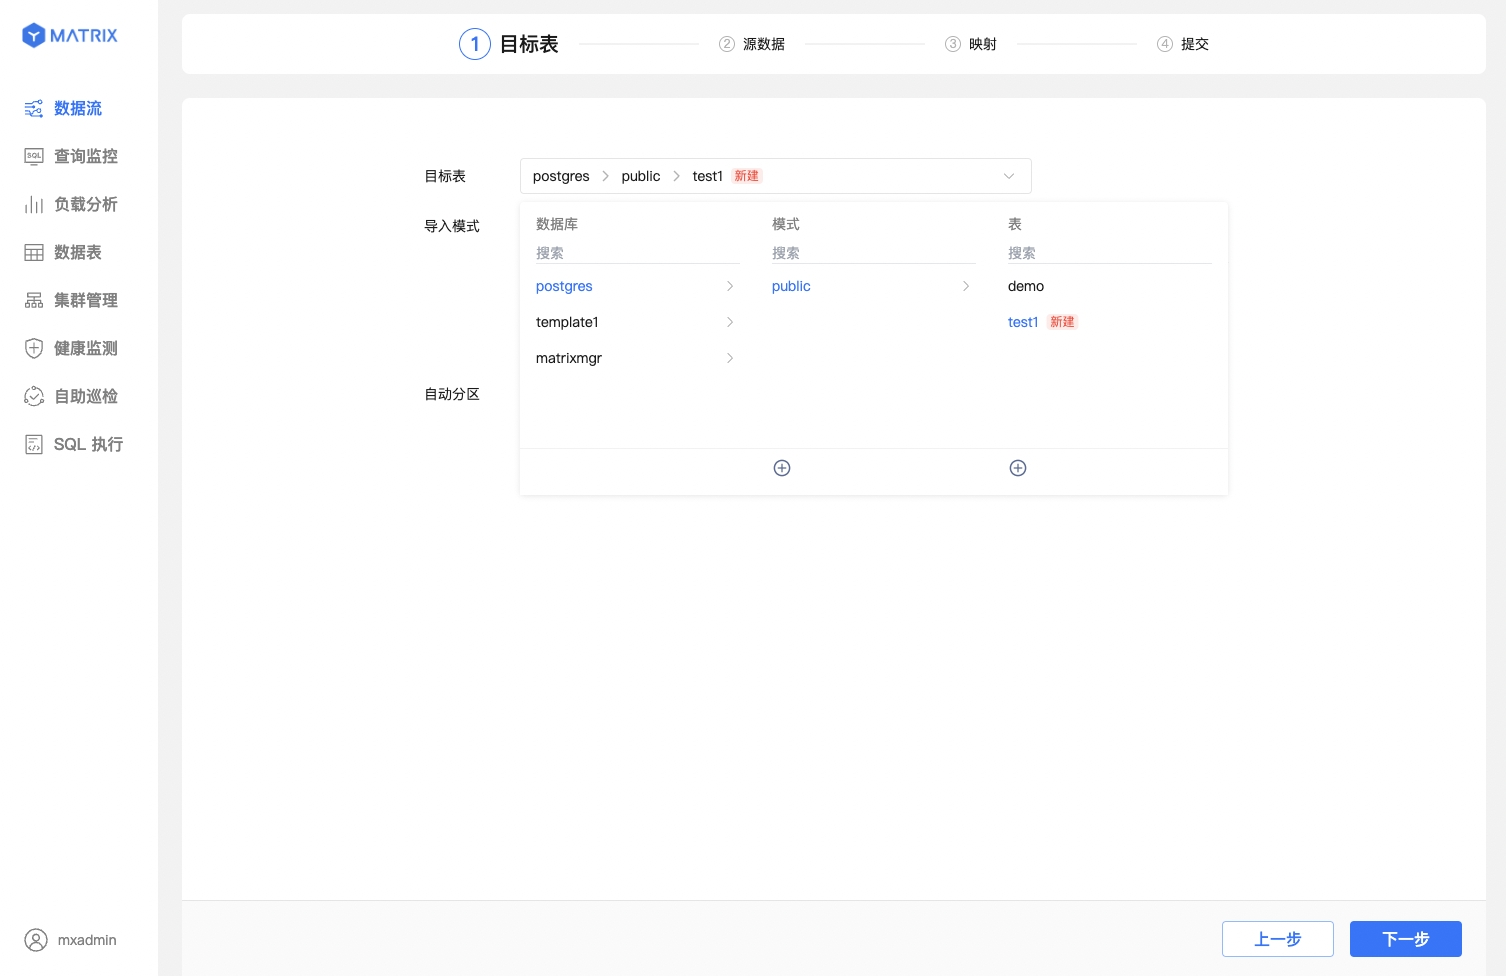
Choose the data import mode and automatic partitioning policy for it. Here, the partitioning policy defaults to auto_partitioning.

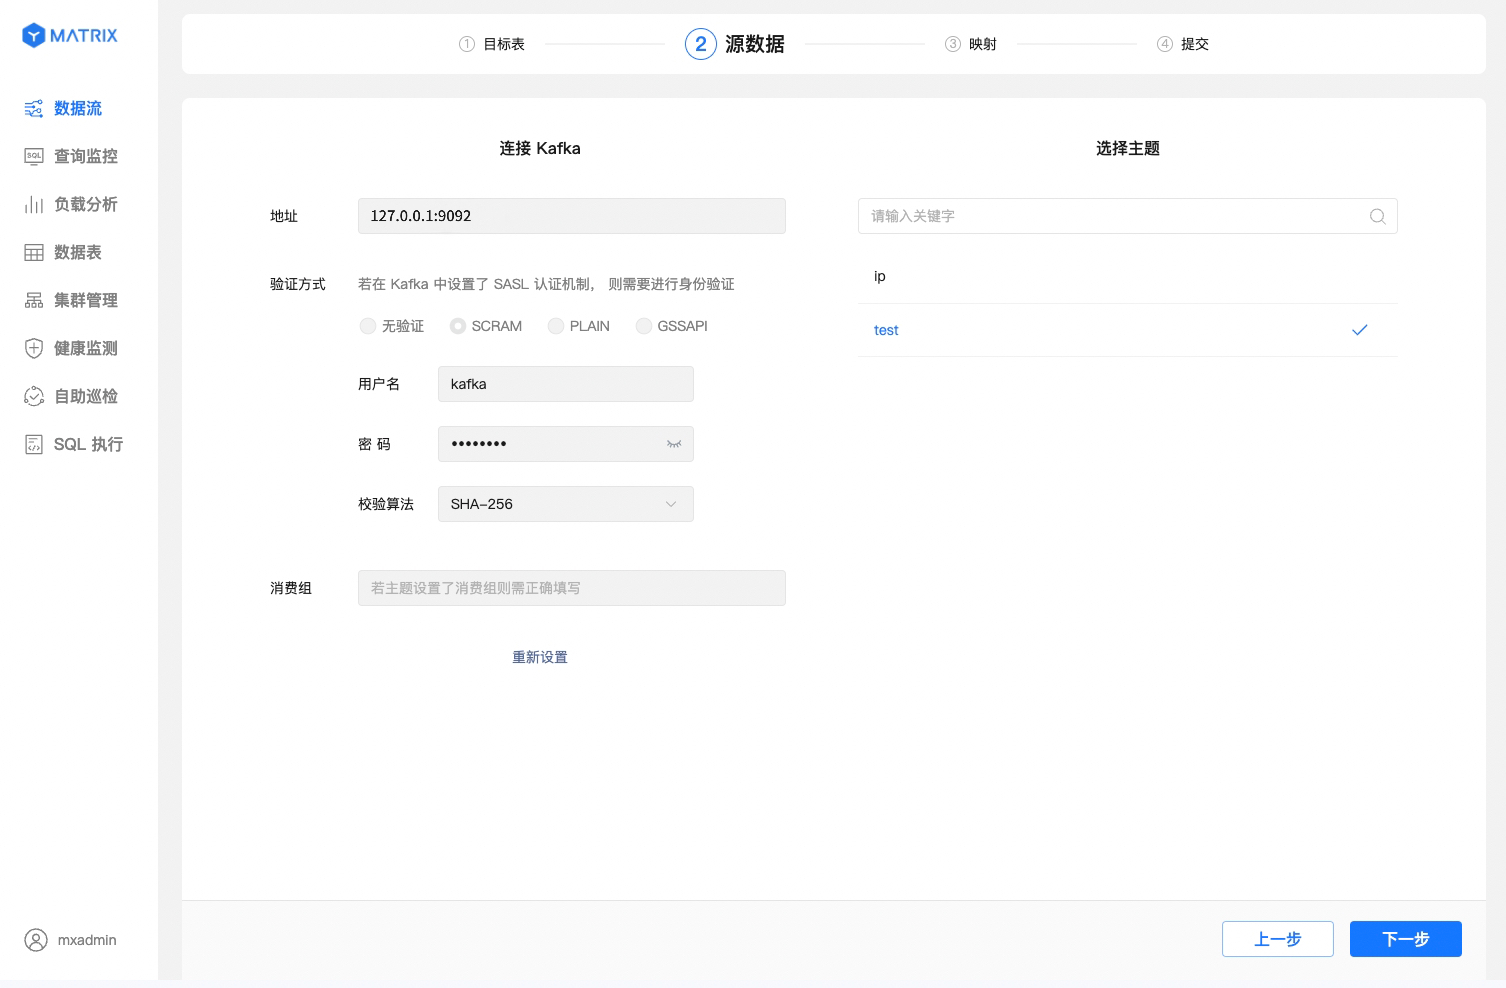
After selecting the target table, the next step is to set up the connection for the source data. To proceed correctly to the next step, you need to complete the following operations:
The third step is to configure sample data and map the existing or newly created table to import Kafka data.
Select the CSV source data format and specify or configure sample data. You need to specify or manually configure the sample data format to ensure accurate mapping.
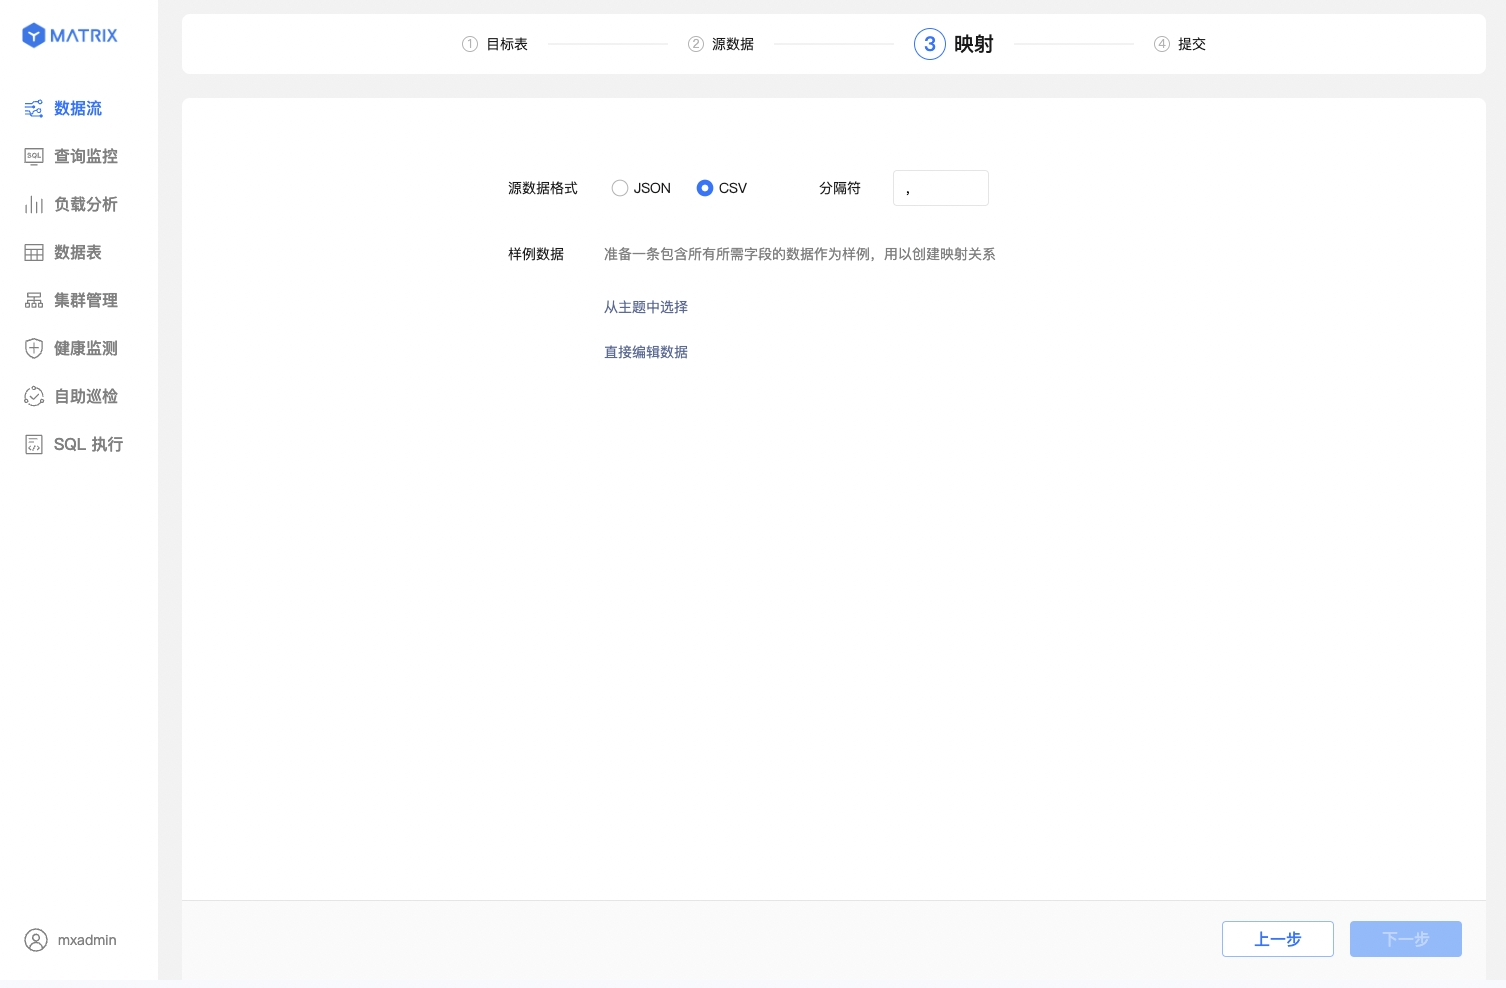
When configuring sample data, you can either select from the topic or edit data directly.
edit data directly and provide a sample data entry according to the target table's field structure. This sample data is only used for field structure parsing and mapping and will not be imported into the target table.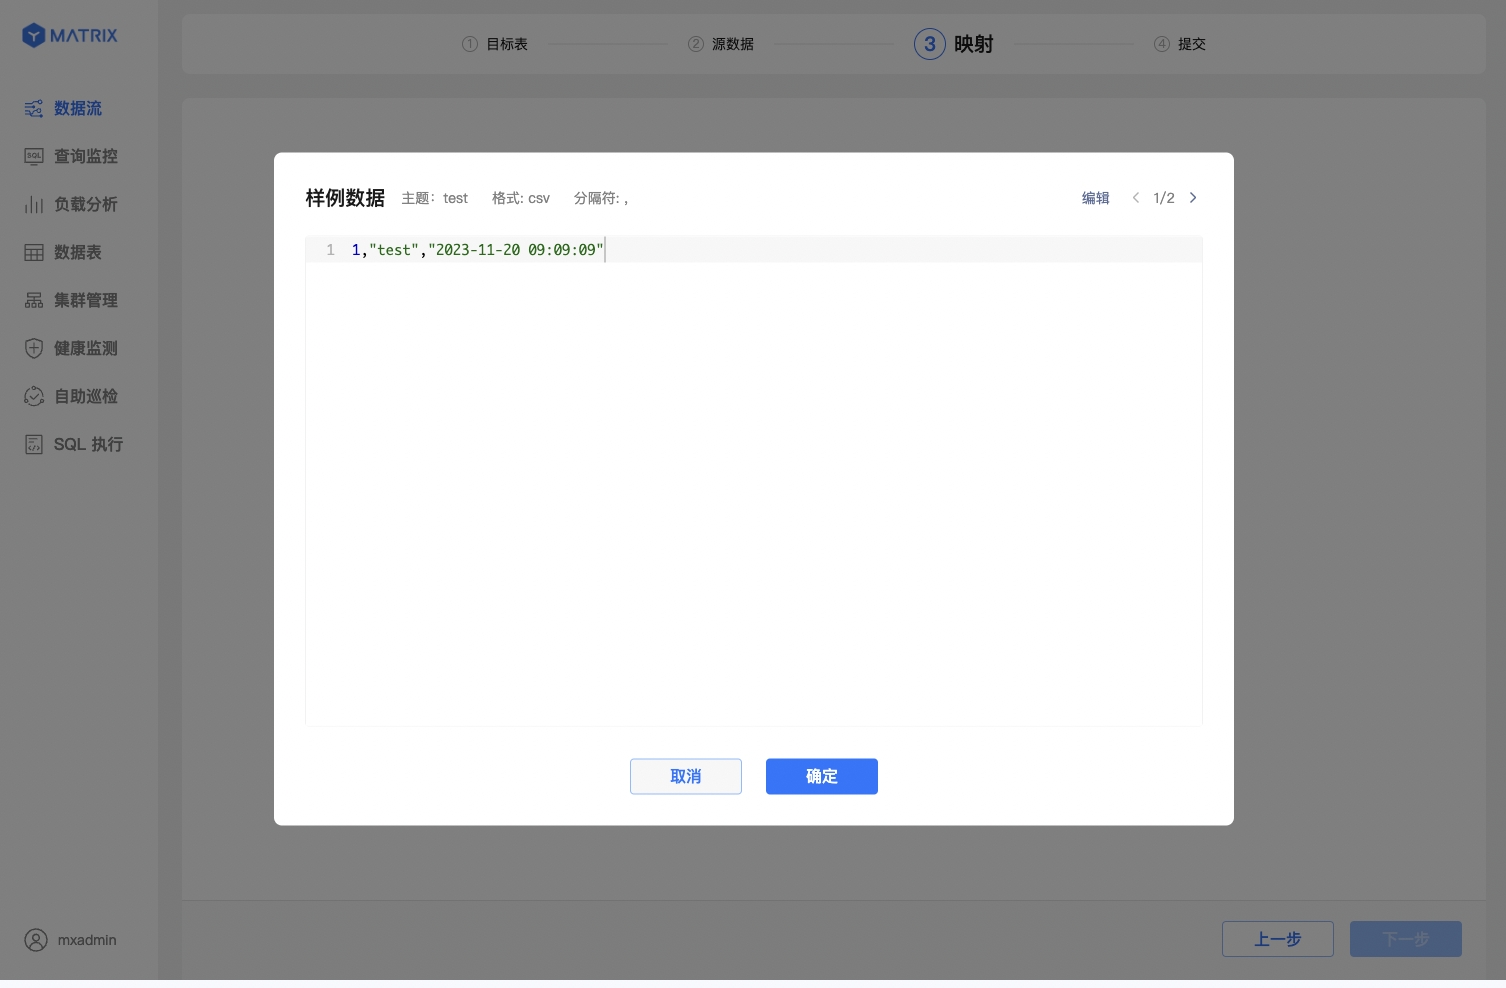
Note!
By default, tables newly created via the graphical interface use the MARS3 storage engine. For more information, see MARS3.
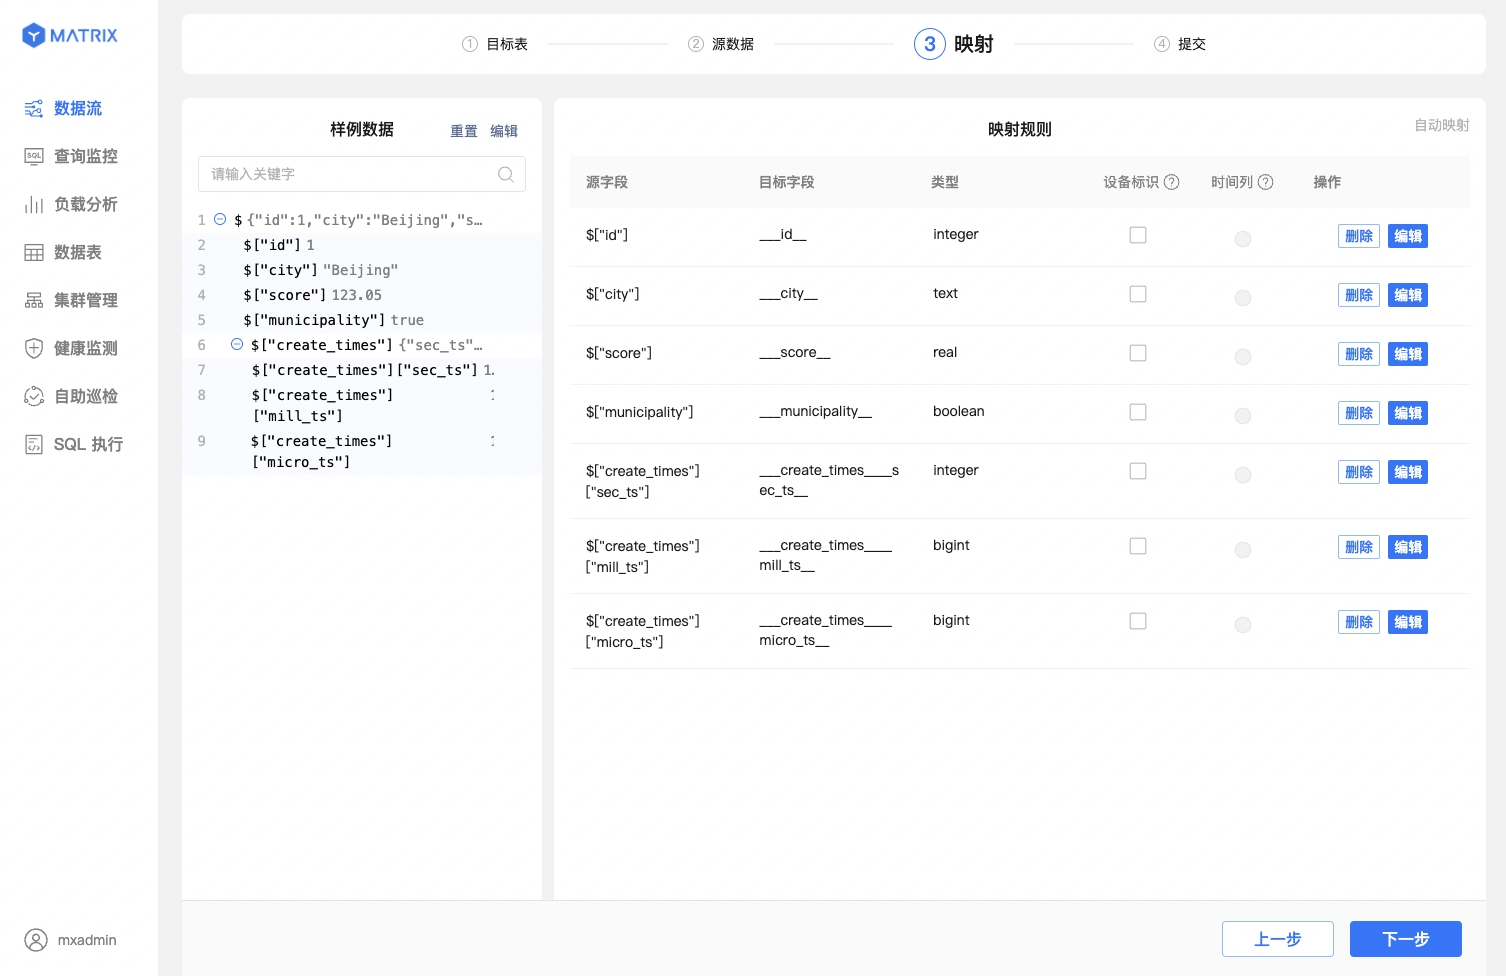
After completing the basic mapping configuration, map the source data fields to the target table fields. There are differences in this step between existing tables and newly created tables.
Mapping for Existing Tables
First, select a sample data entry. Then, in the mapping relationship, find the corresponding target field and set it up. After that, click Save to establish a mapping relationship.
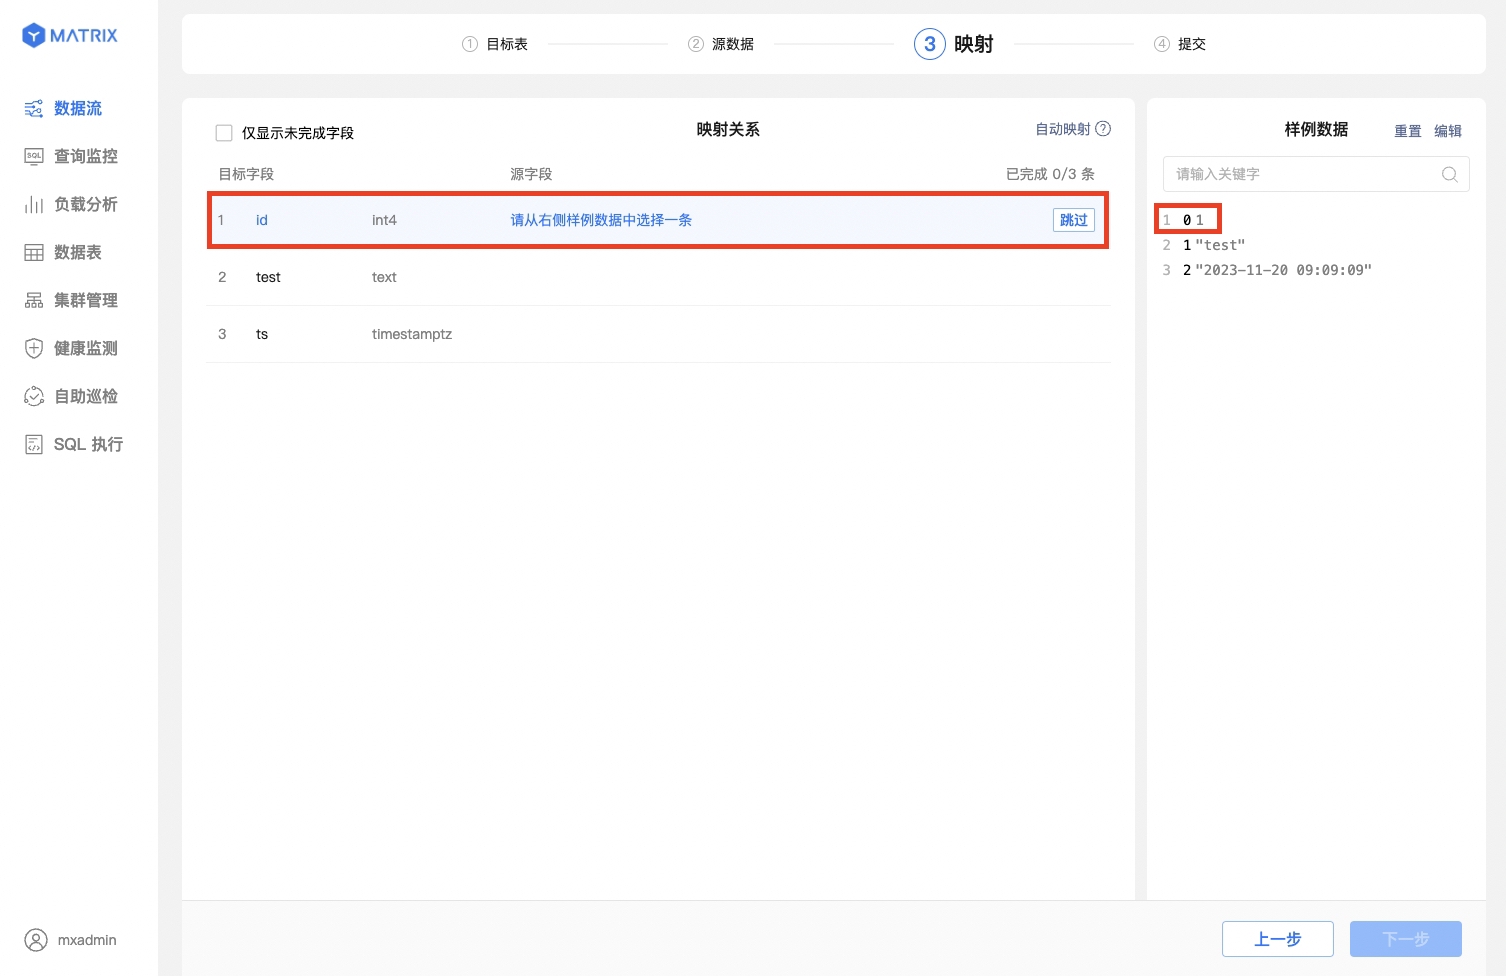
You can also use the one - click automatic mapping feature, which is both convenient and accurate.

Mapping for New Tables
In addition to establishing mapping rules, there are a few more settings to consider when creating a new table:
When the source field value is a UNIX timestamp and the target field type is selected as timestamptz, a checkbox labeled Store as timestamp will appear to the right of the output value. Check this box to automatically convert the output value to the database's timestamp format.
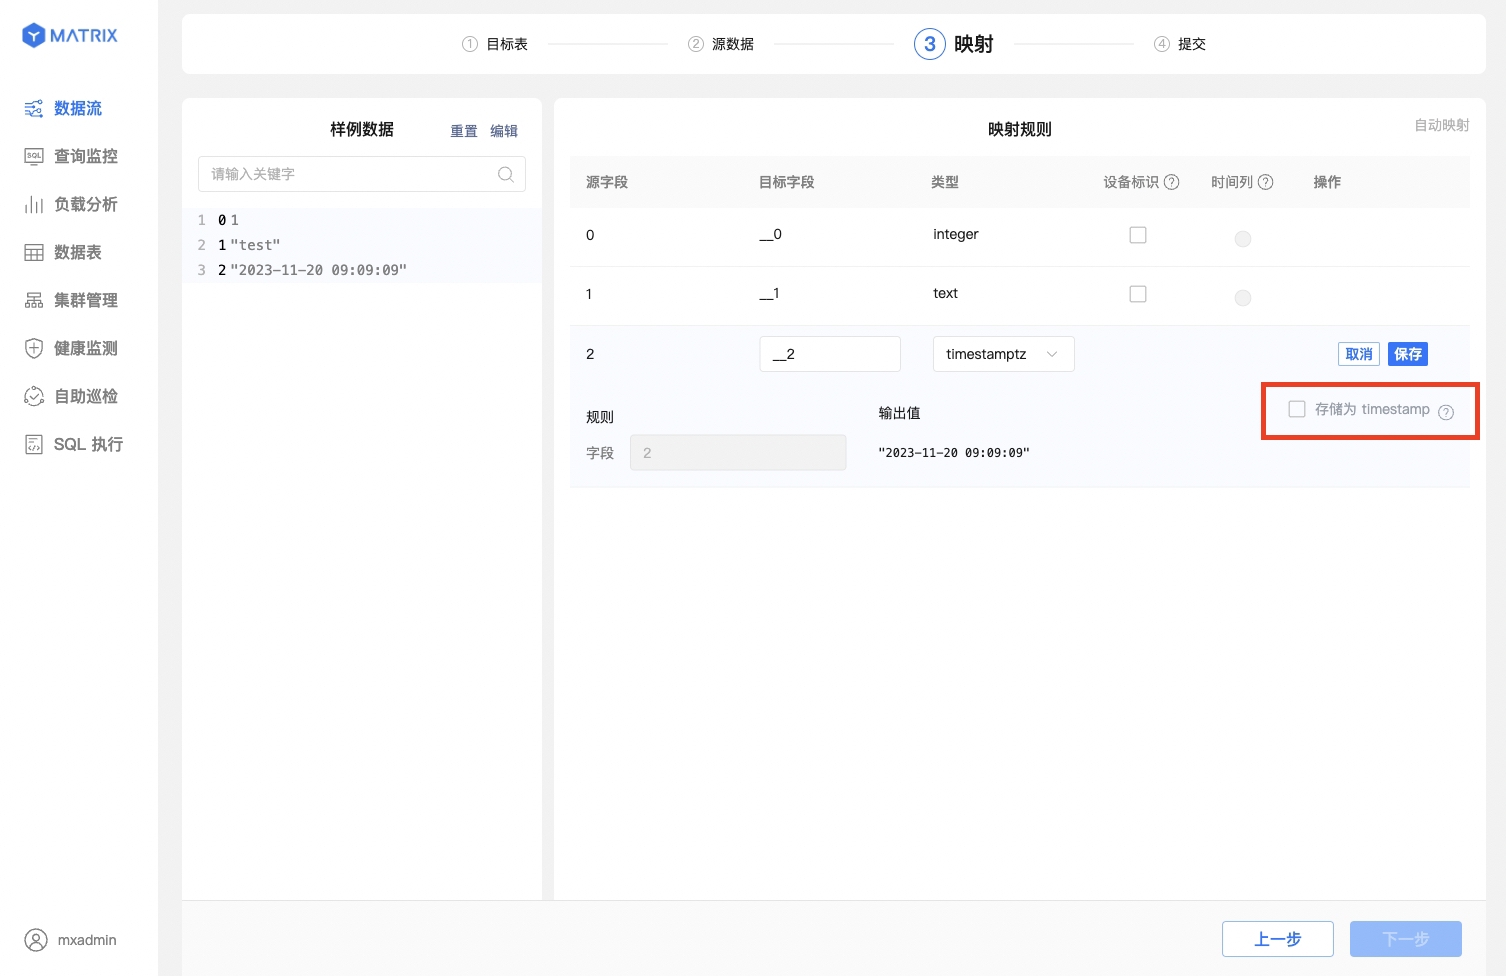
After saving the mapping rules, you also need to select the "Device Identifier" and "Time Column." The "Device Identifier" should be a field or combination of fields with a unique constraint in the target table, while the "Time Column" should be a field of type timestamptz in the target table.

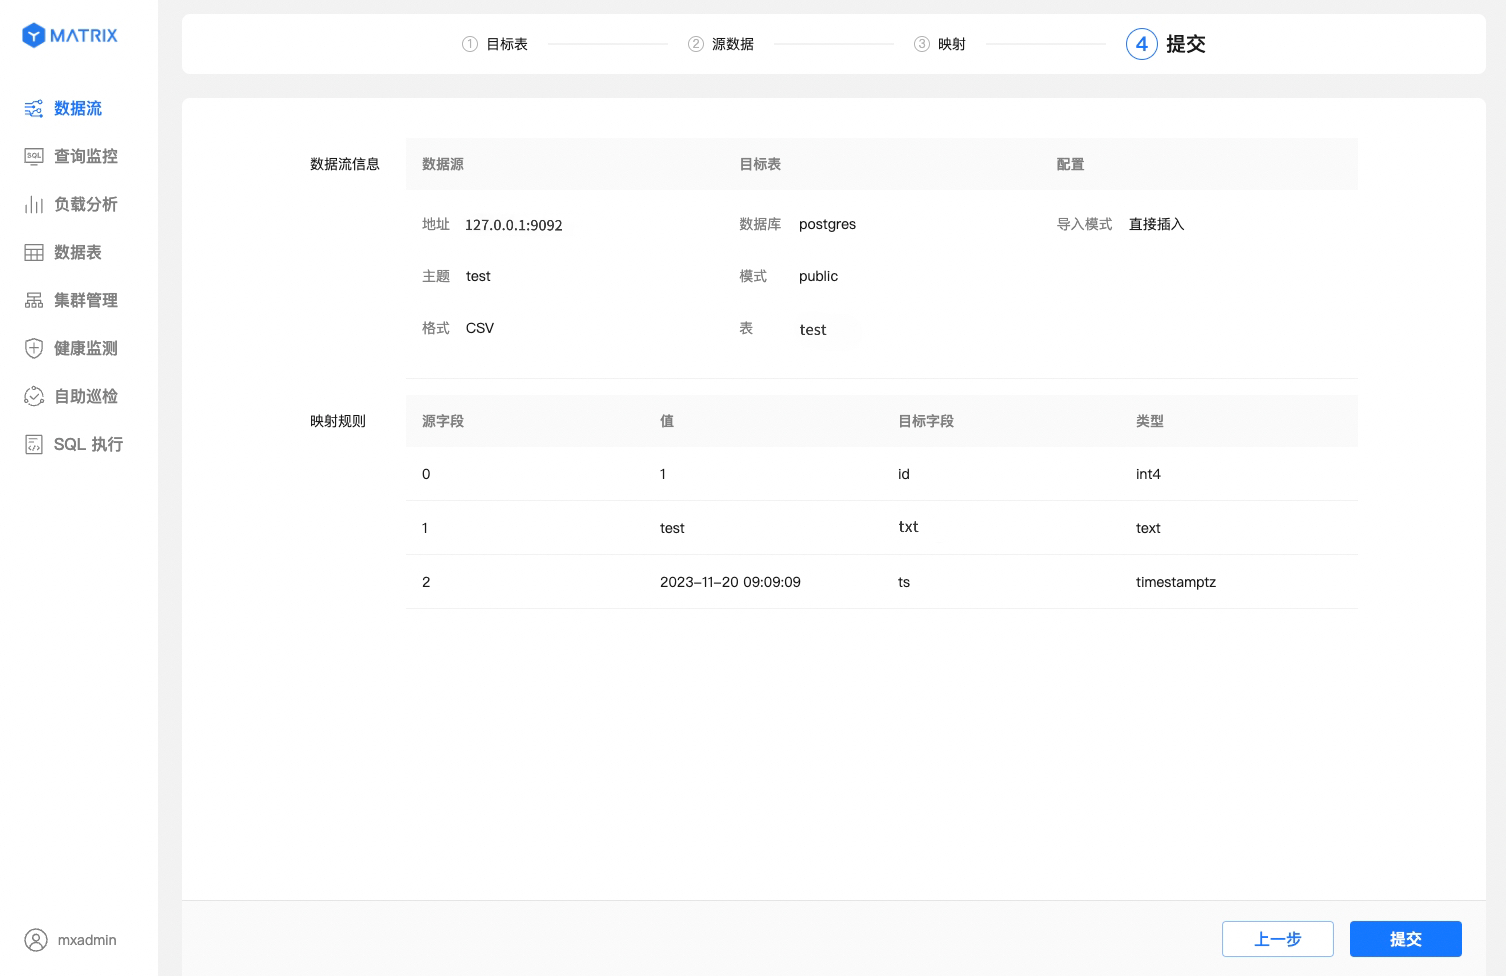
Finally, review all the configuration details of the data stream. If there are any errors, return to make changes. If everything is correct, proceed with the submission.
The page displays all the configuration details of the data stream. After confirming the information, click the "Submit" button.
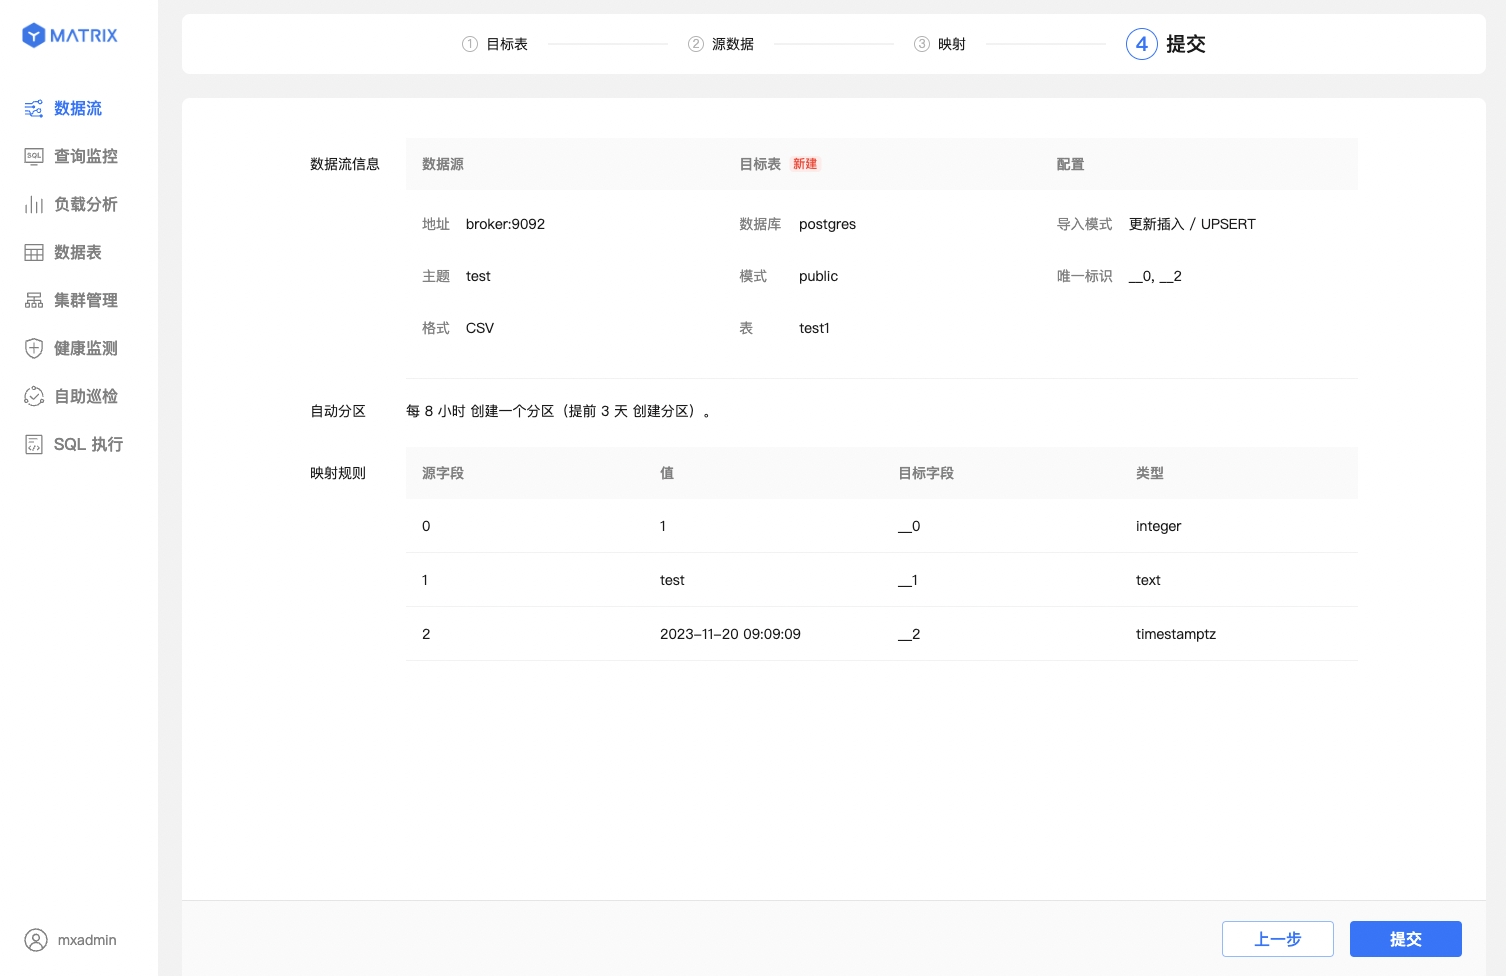
Compared to existing tables, this section also displays the unique identifier information composed of "Device Identifier + Time Column." After confirming the information, click the "Submit" button.
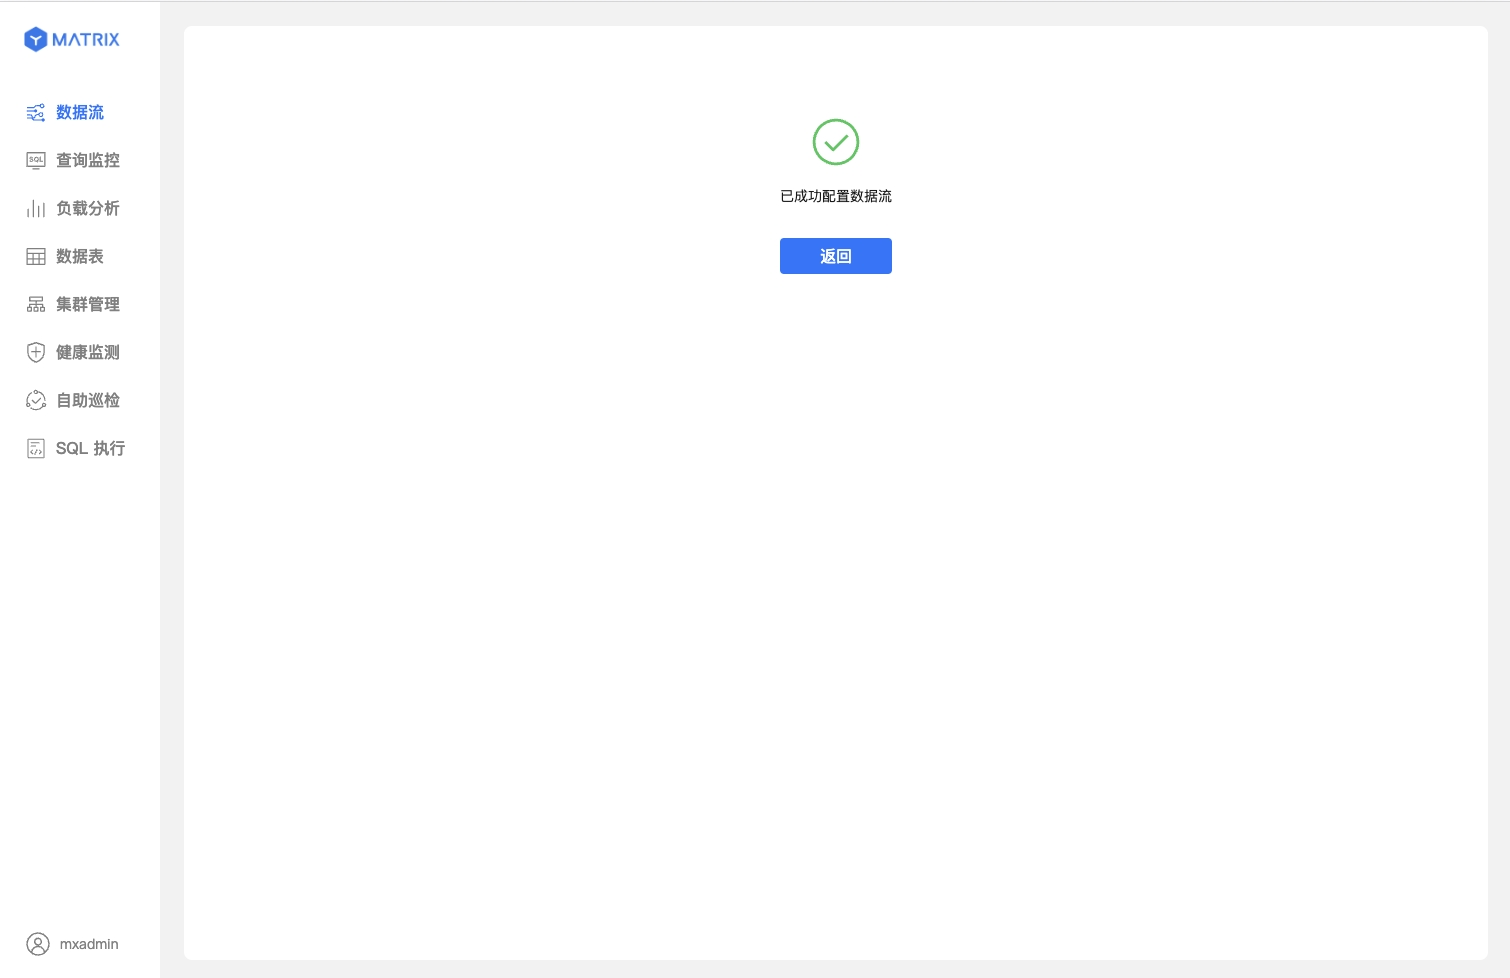
Whether for existing or new tables, after successful submission, you will be directed to a success prompt page. At this point, the Kafka data stream has been successfully created.
This section mainly describes the differences compared to the CSV format integration, which are concentrated in the Mapping step.
First, select the JSON data format and configure sample data.
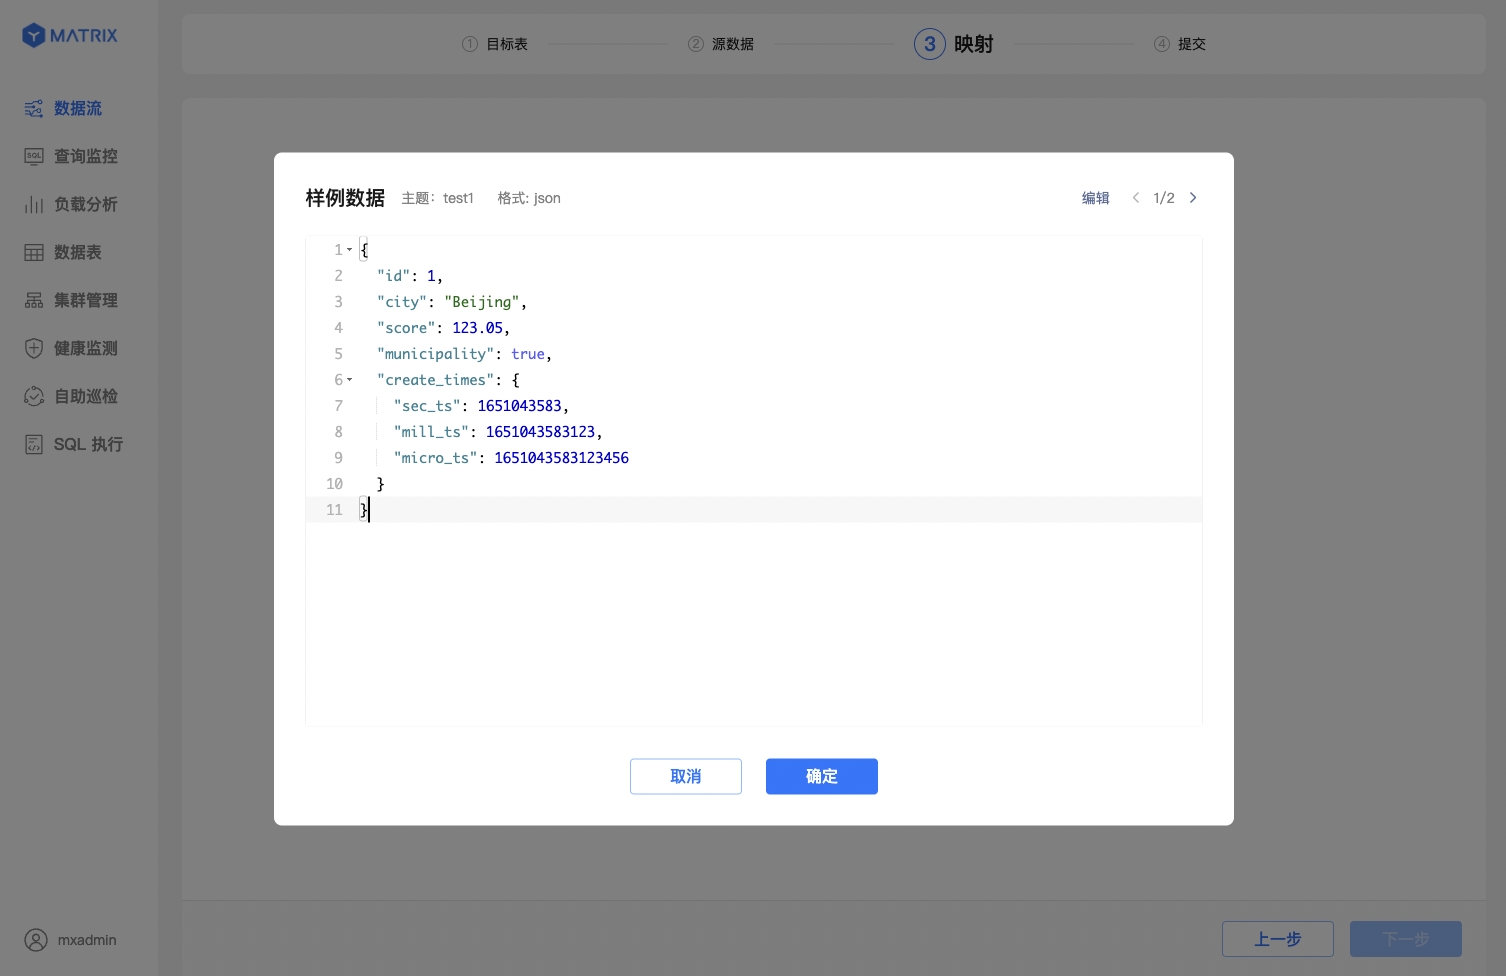
Second, the index for JSON columns uses the $["column_name"] syntax, following the JSONPath rules.
Finally, JSON data supports multi - level nesting. YMatrix allows you to create mapping rules based on source data fields from different levels. Click the ⊕ in the Sample Data section to expand the nested levels.
After you create a Kafka data stream using the YMatrix graphical interface, data will be continuously imported into YMatrix. If you need to temporarily pause the import of Kafka data due to service debugging or other reasons, you can do so directly from the graphical interface.
For running Kafka data streams, you can pause data import from both the Process View and the Task View.
Note!
The pause operation may take 1 - 10 seconds to take effect. During this period, no other operations can be performed on the data stream. After the pause operation is completed, Kafka data will stop being imported, and the status will switch to "Paused."
For Kafka data streams in the "Paused" state, you can resume data import. After confirming the resume operation, the data stream will immediately start importing again, and the page will refresh to display the latest import information within a maximum of 5 seconds.
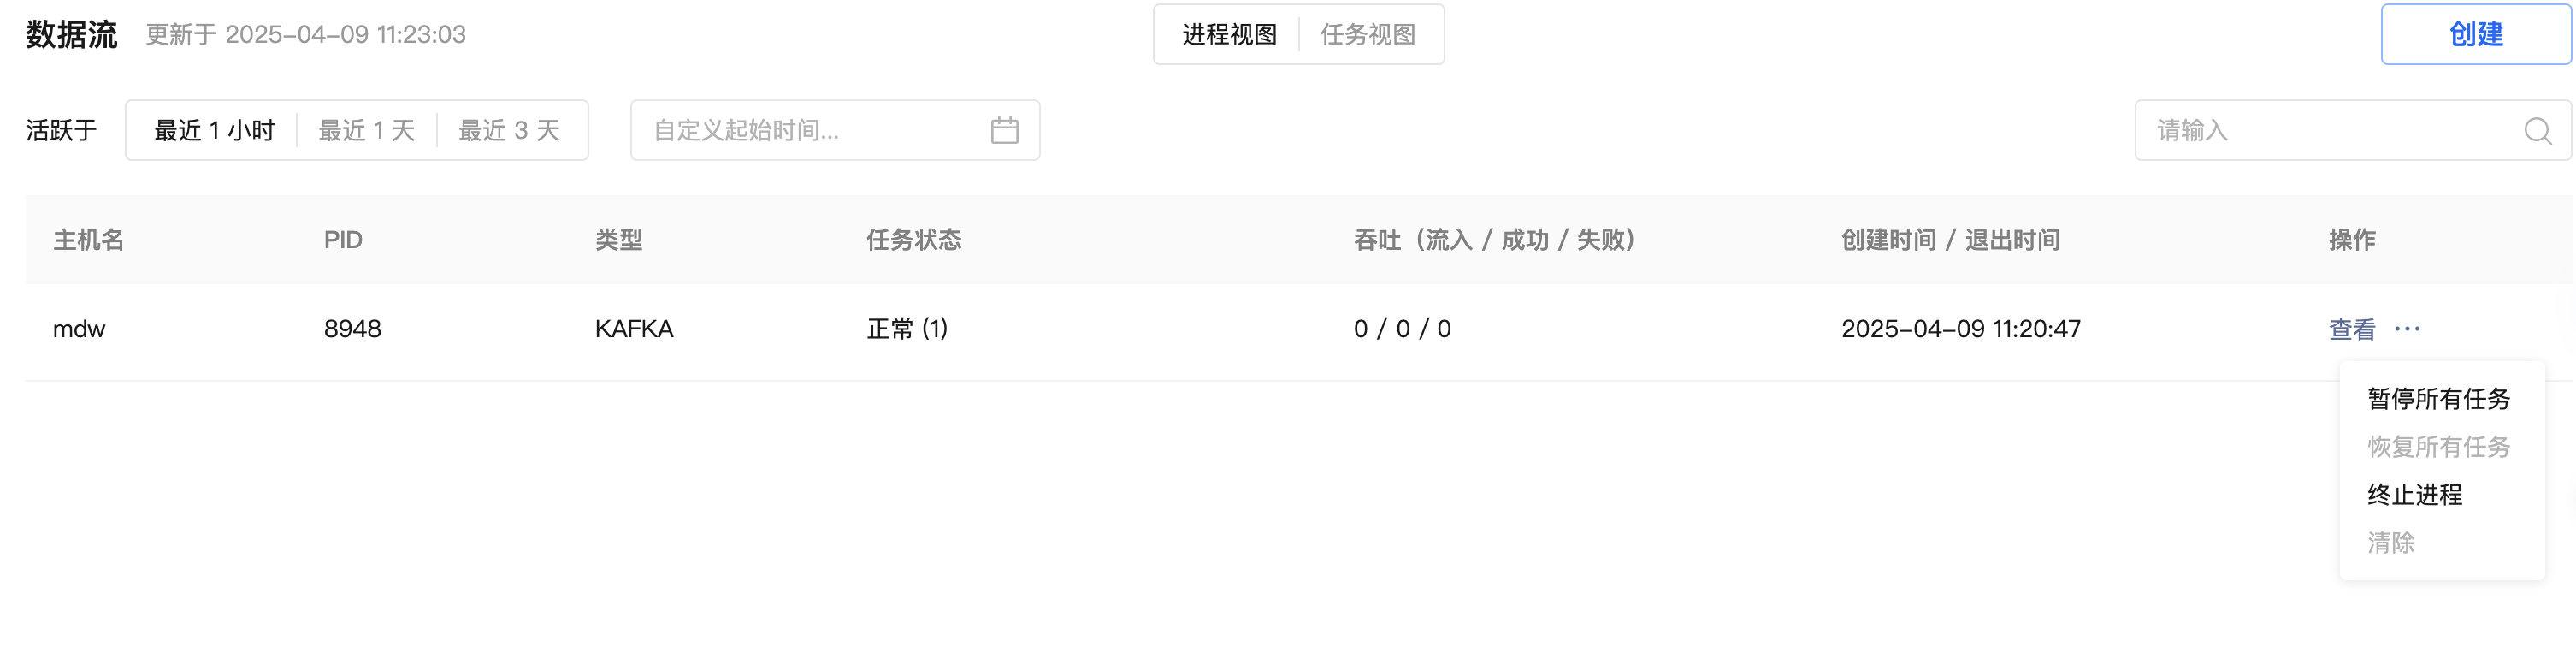
The extended button under the operation menu allows you to pause all tasks, resume all tasks, terminate the process, and clear operations.
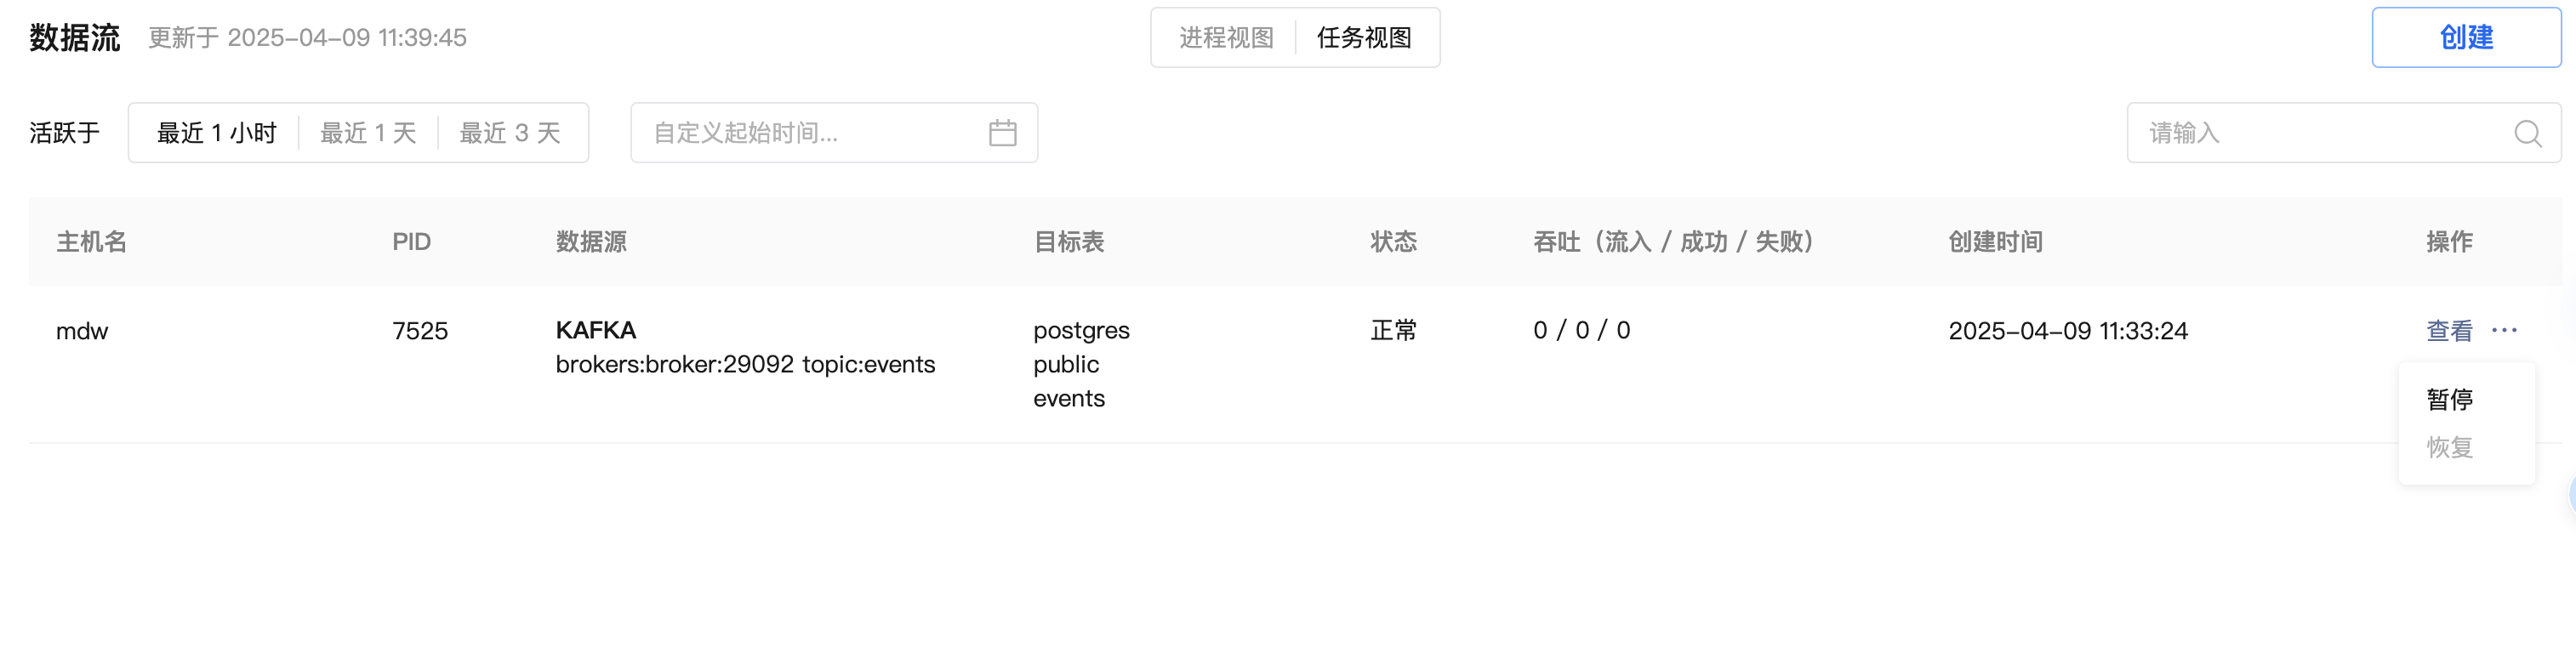
The expand button under the operation menu can be used to pause and resume operations.